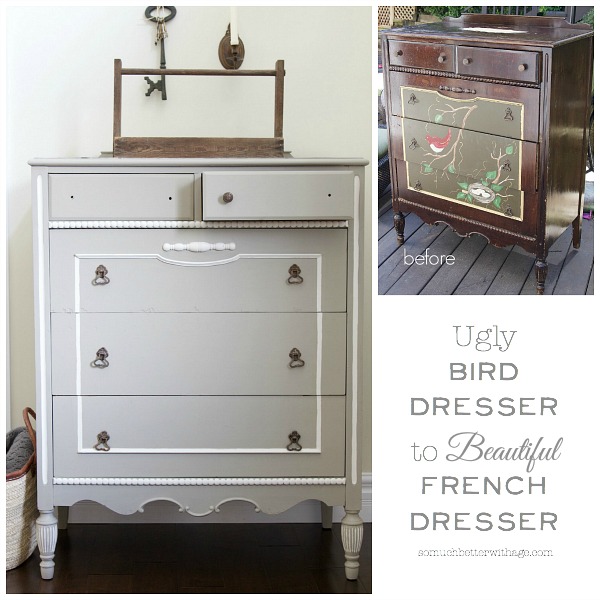
Ugly Bird Dresser to Beautiful French Dresser
How I transformed this ugly bird dresser to a beautiful French dresser with just a little paint and lots of love.
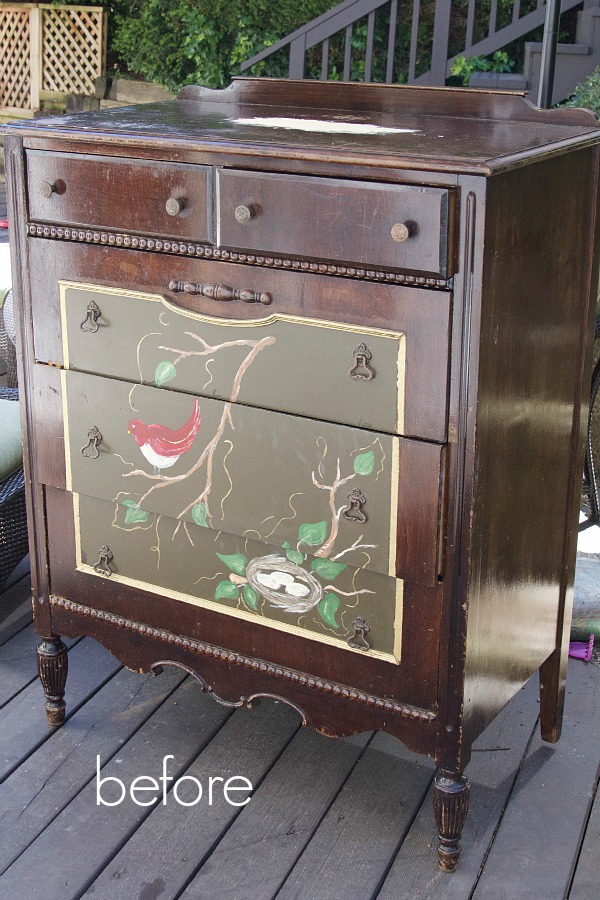
You probably don’t remember this bedroom dresser when I showed it to you last week.
Because it was hideous. I called it the ugly Bird dresser.
All it took was some pretty paint to reinvent it.
I’m now in love with my ‘new’ French dresser.
You have got to see what it looked like before. You won’t believe the transformation!
So here is the Bird dresser that I posted about HERE last week.
Yikes, right?
I didn’t feel bad about painting it all since it was already half painted.
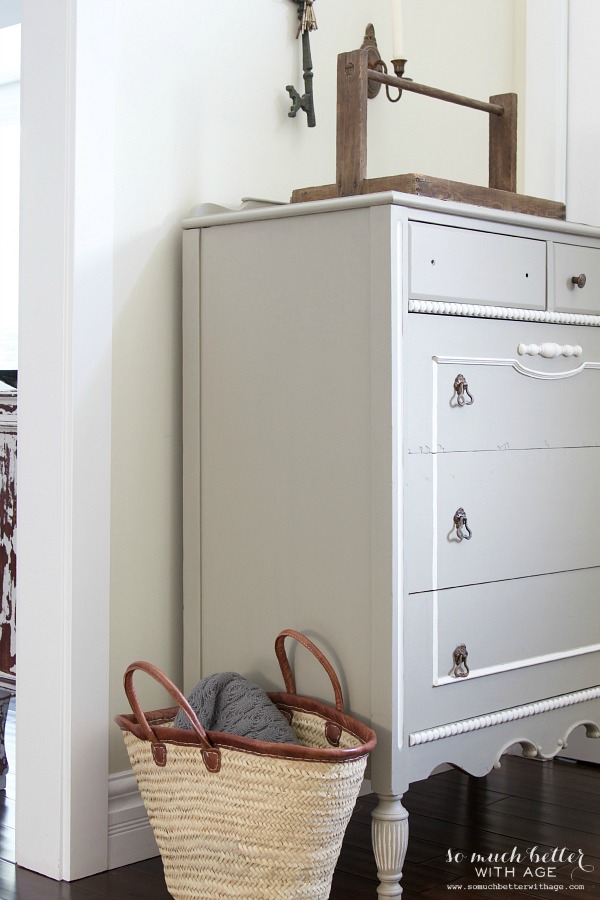
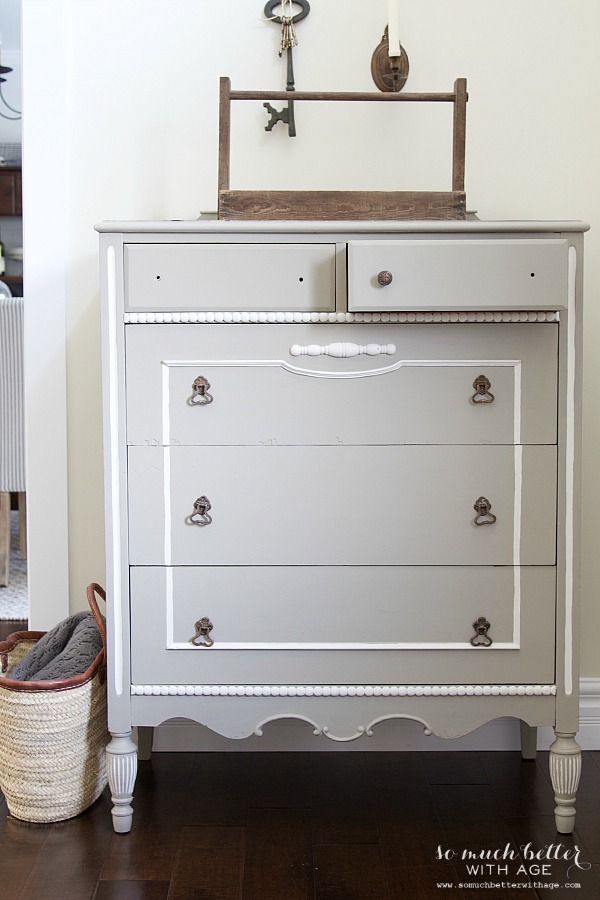
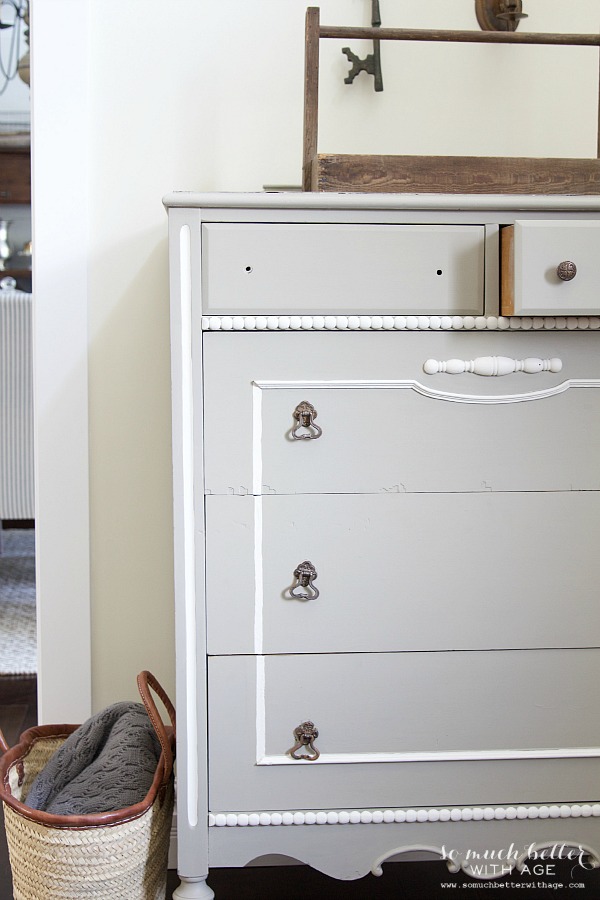
And now the after, completely up cycled!

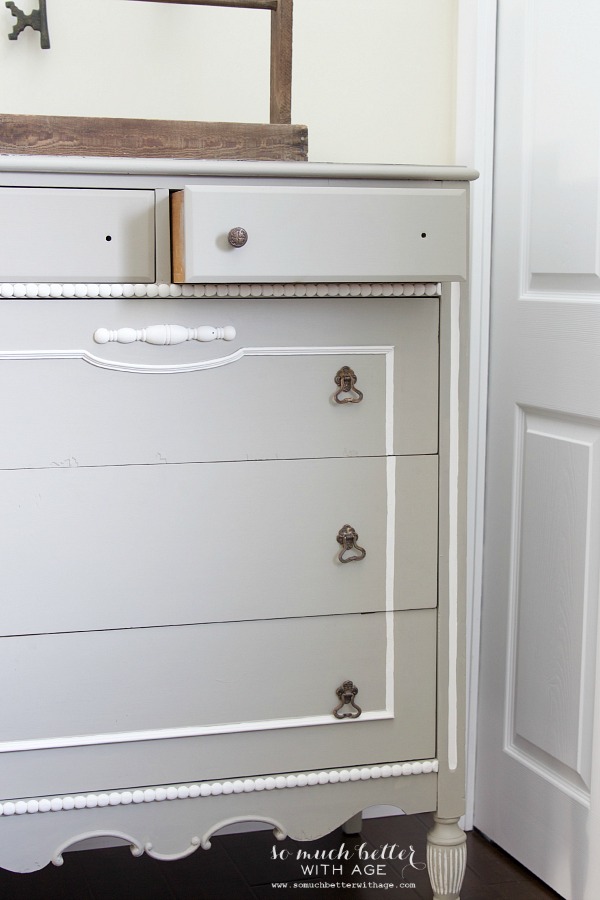
Unfortunately, most of the handles broke. They were very fragile. I think someone left it out in the rain for some time because there are parts of it that are very warped.

I did my best to repair bedroom dresser before I painted it but some of the imperfections add to its charm.

We found it curbside!
Just look at the details that pop out. I painted it in the neutral color Linen with Fusion Mineral Paint from the Michael Penney Collection and the white I painted with Champlain freehand.
I need to look for new handles as most are just sitting in the holes, not screwed in. Also most of the backings have broken off completely.
I couldn’t wait to show you how it turned out though.
It’s truly amazing how just some paint can transform an entire piece.
It’s gone from an ugly Bird dresser to a beautiful French dresser.
I’m so in love!


Sharing at these link parties & Coastal Charm & Mod Vintage Life & The Scoop & The Shabby Nest & Thrifty Decor Chick


Cannot believe that is the same dresser! WOW! I love the colours you chose to paint it and that you did the details in white. This is just simply stunning now!
Thank you so much, Gilly. I love the finished result too.
Hugs, Jamie
Oh I love the dresser !! It looks so much better!!
Huge transformation, right? Thanks Shawnna!
Hugs, Jamie
That smokey gray color is perfect with the white. I love furniture transformations, and this one is stunning!
I love a good furniture makeover too. Thanks so much, Eva!
Hugs, Jamie
It’s beautiful Jamie! I can hardly believe that’s the same dresser Amazing work.
It is hard to believe! Thanks April 😉
Hugs, Jamie
I knew getting rid of the bird would make it pretty, but this looks amazing! A perfect French look and I love how you painted the turned feet.
Too bad about the handles. They look like they were pretty…and it is such a pain to want to get a project done and then not have what you need to finish it right at hand.
I know, the hardware part sucks. But I couldn’t wait to photograph it! lol. Thanks so much Jamie 😉
Hugs, Jamie
Looks much better…beautiful! Freehanded the white? You must have VERY steady hands LOL Great job!
Thanks so much, Debbie 😉
Hugs, Jamie
You did a fantastic job …what a transformation! I love those colors.
I just finished a dresser and am looking for some vintage-like pull rings. Home Depot has over 200 but each is a different size–it’s very confusing. Any tips?
Jane x
I usually order from Lee Valley but I’m in Canada. Not sure if they deliver to the US. They have a great selection of hardware!!
Hugs, Jamie
So pretty, Jamie x
Thanks Danielle 😉
This dresser is gorgeous! I love the pale greyish paint you chose and all those cute white
touches :)I hope you will share it with our Link Up – Idea
box: http://milaslittlethings.com/2015/06/idea-box-thursday-link-party-16.html
Hugs,
Mila
Thanks Mila 😉
Hugs, Jamie
Beautiful colors!!
Thanks Susan!
This looks great!! Love a good furniture makeover!
Thanks so much, Meg 😉
LOVE the transformation!!! did you find the Fusion paint ‘self leveling’ sufficiently to eliminate brush marks? been having that problem…
Hi Jane,
I find more of a problem using a roller than brushes. I used a fairly good paintbrush and it seems to work fine. But when I’ve used a smaller paint roller, it seems to bubble up more. I took a foam brush and brushed it lightly over the roller marks. What furniture did you paint that you find that problem?
Hugs, Jamie
Beautiful transformation! I bet you could find similar hardware at Lee Valley, they have a timeless collection that would probably be a good replacement!
Thanks Virigina! Yes, Lee Valley is my go to for hardware.
Hugs, Jamie
Wow! What a transformation! Can’t believe these two are the same object. Can’t wait to see the finished product!
Thanks so much! I know, crazy transformation!!
Hugs, Jamie
Hi = I have just subscribed to your blog and look forward to reading more. This dresser is absolutely wonderful what you have done to it. I love old pieces of furniture but am not fond of some that are painted and then etched all over to look old. You have done a wonderful job. Betty from Ontario . Canada.
Thanks so much for being here, Betty! A fellow Canadian, I love it. Thanks for your sweet comment.
Hugs, Jamie
What a wonderful transformation! The paint combination you chose is just gorgeous. It’s an inspiring upcycle.
I’m a die-hard dumpster diver & curbside picker (is that even the name for it???) and will drag just about anything usable into my truck. I’ll also remove hardware from pieces that are too far gone and add them to my stash (much to my husband’s dismay, “Honey, where do you plan on storing that until you get to it? With the other 14 pieces of furniture you have waiting for you to work on?” or “Do you really need another 8 knobs/hinges/pulls???”). 😉
Lee Valley is also my go-to place for hardware, tools, etc. If you can’t find the handles you want or ones that only screw in you could try the following, which I’ve used with much success: Take as many wooden toothpicks that you can fit into the hole where the handle goes, push them into the hole, mark the edge of drawer on the toothpick bundle and cut them down to size (I usually leave a little extra and sand off when finished. Now, put some good wood glue into the hole and around the toothpicks, smearing the glue well into the bundle. Insert the toothpicks into the hole, wiping any excess glue that comes out. Check it periodically (more frequently in the beginning) to make sure no glue has seeped out. Let it dry for a few days. When you’re sure it’s dry carefully sand the toothpick bundle so it is even with the drawer surface. Next, choose a drill bit slightly smaller than the screw on the handle and drill into your new plug. Don’t go in too far, just enough to let you get the screw to hold, then screw it in fully with a regular screw driver or by hand. If the hole goes through the wood, use the same process, just make both front and back even with the surface. This has worked like a charm for many pieces I’ve worked on.
Anyway, I just love your work. Such a good eye!
Hi Jennifer,
A fellow curb side shopper, I love it! I too love Lee Valley for handles. It’s the greatest place. And thank you so much for sharing that invaluable tip. Such a great idea!! So glad to have you here.
Hugs, Jamie
You are amazing and have so much vision. The dresser is beautiful!
Thanks so much, Jolene!
Hugs, Jamie
You did such a good job. I love it.
I love this dresser. You did a wonderful job.
Thanks Jan!
Hugs, Jamie