
How to Make a Desk from an Extendable Table
Do you have an vintage extendable table that you don’t use anymore? I’ll show you how to make a desk from an extendable table and how easy it is to do.

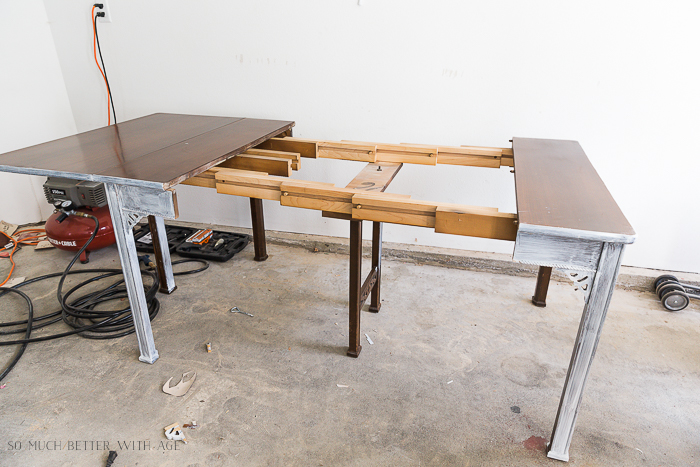
I was given this table from a family member a few months ago for a book project and I knew I wasn’t going to use it as a table but just as a desk. I was going to leave it as is and even started to prime it with paint but the legs in the middle just seemed too funny, especially I knew it was never going to be used as a long table again.

Here is the table fully extended. It came with many leaves and you can see by the size it could seat a lot of people. I just don’t have a need for another long table.
Determine What Will Be Your Desk Top
The very top of this table, when it’s in compact mode, is one large piece that lays over two cut pieces (you can see in the photo above). It flips up and over and lays flat on extended arms that pull out.
Not all tables are like this though. Some extendable tables have a top that is basically split into two so that when it is extended, the leaves just lay in between them those two top pieces. If yours is like the latter, you can make a desk top by screwing the two pieces together from underneath with brackets. Then use wood fill to fill in the seam, let dry, and and paint.

How to Turn the Extendable Table into a Desk
- You first want to start by flipping over the table and unscrew the legs from the top. The legs should come out easily and the centre legs and pieces of wood can be recycled.

2. Mock up how the legs with be spaced out.

3. Determine which piece(s) of wood will be your new desk top.
The top on this table was quite damaged and scratched so we flipped it over to become the underside of the new desk.
4. Make sure to keep decorative elements facing out.
You can see in the photo below that the two corners on the right side are bull-nosed but the other two on the left are straight. You can put the straight side against a wall so you won’t notice the different corners. Make sure that the best looking legs are facing the front of the desk.

5. Measure each leg using a square onto the desk top, mark and pre-drill holes. Screw the legs back in their new home.

6. Fill any cracks or leave gaps facing the back.
Not every piece will match up together so if there’s an open space, make sure it’s at the back of the desk and you don’t need to fix it. If it bothers you, you can glue and screw in a piece of wood in that space. Make sure to fill any cracks/seams with wood fill. Leave to dry, sand until smooth then prime and paint.

7. If there are any decorative touches you don’t like, be sure to remove them before painting.
I cut off the decorative scrolly-wood pieces underneath in each corner as some of them were broken and it looked cleaner without them.

8. Prime and paint your new desk.
Painting your new desk will also hide any filled seams and no one will know it was ever an extendable table.
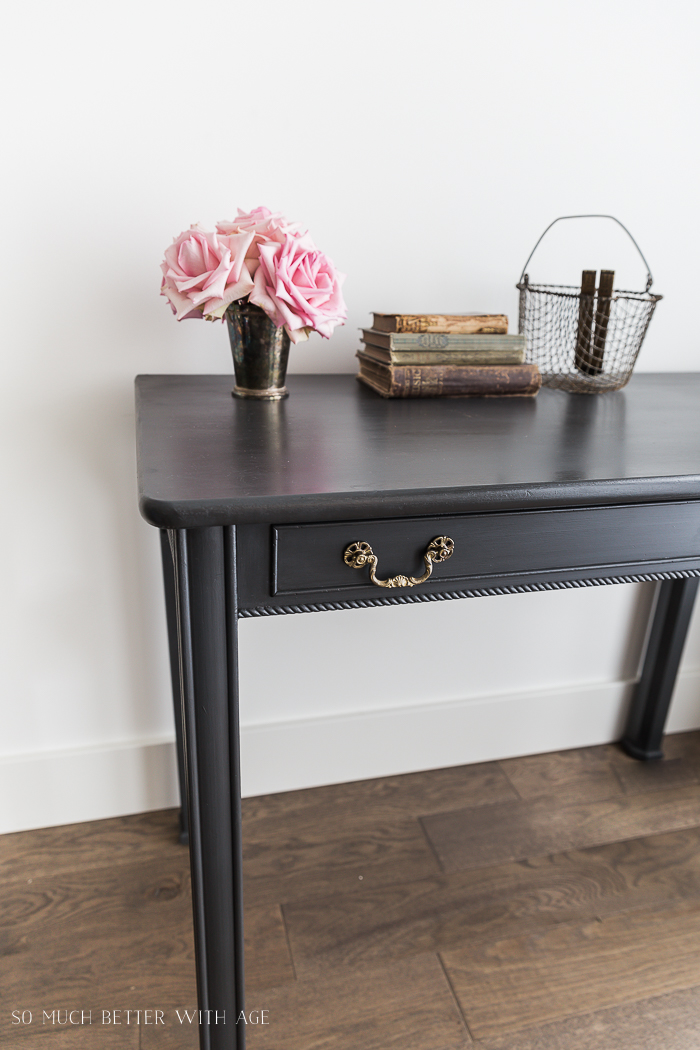
9. Add drawer handles to make it look like a desk drawer.
I love how this extendable table already looked like a desk with the original drawer handles. You can pre-drill holes for handles on each side of the front to make a faux drawer. It will definitely make your extendable table look more like a real desk!

This painted desk is a project in my new book, French Vintage Decor. Be sure to order your copy! I’m so appreciative of all pre-orders so thank you in advance.

Click to Order Your Copy of French Vintage Decor

How to Decide Whether or Not to Give Antique Furniture a Makeover


Wow, looks great Jamie!
Thanks Julie!
Hugs, Jamie
That looks great! Any thoughts on what to do to a gate leg table. Love your blog and thanks for all the great ideas!
Thanks so much, Laurie! You’ll have to email me a photo of that table you’re talking about.
Hugs, Jamie
It looks great! What color and what type of paint is this?
Hi Mari,
I believe I used Ash from Fusion Mineral Paint, it’s a charcoal grey color. I explain this paint tutorial in my book and I never specified which paint I used but that’s the only charcoal grey I see on my paint shelf. Graphite from Annie Sloan is also very similar. I used a dark wax over top to get the deep textured look.
Hugs, Jamie
Oh, my word, that is truly stunning. What a gorgeous piece – very well done, Jamie!
♥ it!!!
Thank you so much, Michele!
Hugs, Jamie
I just pre-ordered your book on Amazon.
I love your style and how your have made you home over to its current amazing space. When I first went to your blog I thought “…better with age” was also about being a more “seasoned, advanced adult” which is me. I was totally delighted with your style and fresh, honest, and sincere approach to design and life! Being a “seasoned, advanced adult” does not take me out of the mix of enjoying new ideas and approaches to living a better life.
Thank you –
Aww, thank you much, Kathleen! You are definitely not out of the mix, never 😉 I’m so glad you’re here. I’m sending subscribers who pre-order my book a signed bookplate. Let me know if you’d like me to email you one!
Hugs, Jamie
Thank you! And, yes, a bookplate for your book would be lovely, it is pre-ordered from Amazon so as soon as it is available they will ship it to me.
Kathleen
Another fabulous project Jamie. I love how you saw past the big table to create this very chic desk. The colour is absolutely perfect too…. love it!!
Thank you for sharing at Create, Bake, Grow & Gather this week. I’m delighted to be featuring your beautiful desk at tonight’s party and pinning too!
Hugs ~ Kerryanne
Hi Kerryanne,
Thank you so much for the feature, my friend!
Hugs, Jamie
can you tell me anything about this table? I’m looking for this exact table to use in my dining room. thanks