
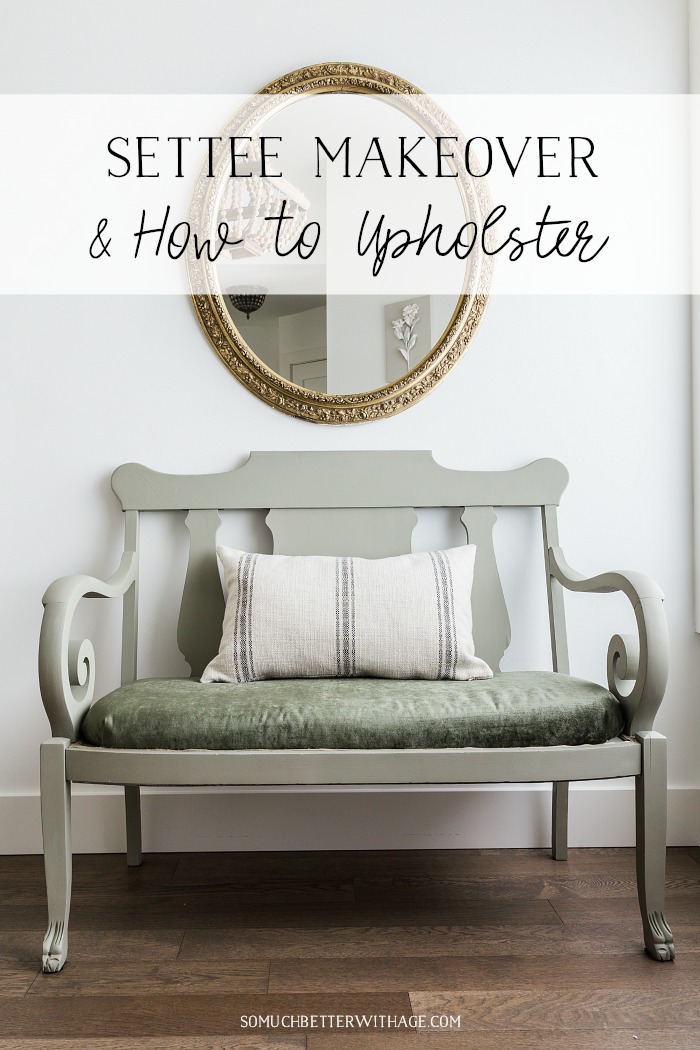
Settee Makeover – How to Upholster a Bench Seat
This settee bench makeover shows you how to upholster a bench and update a piece of furniture.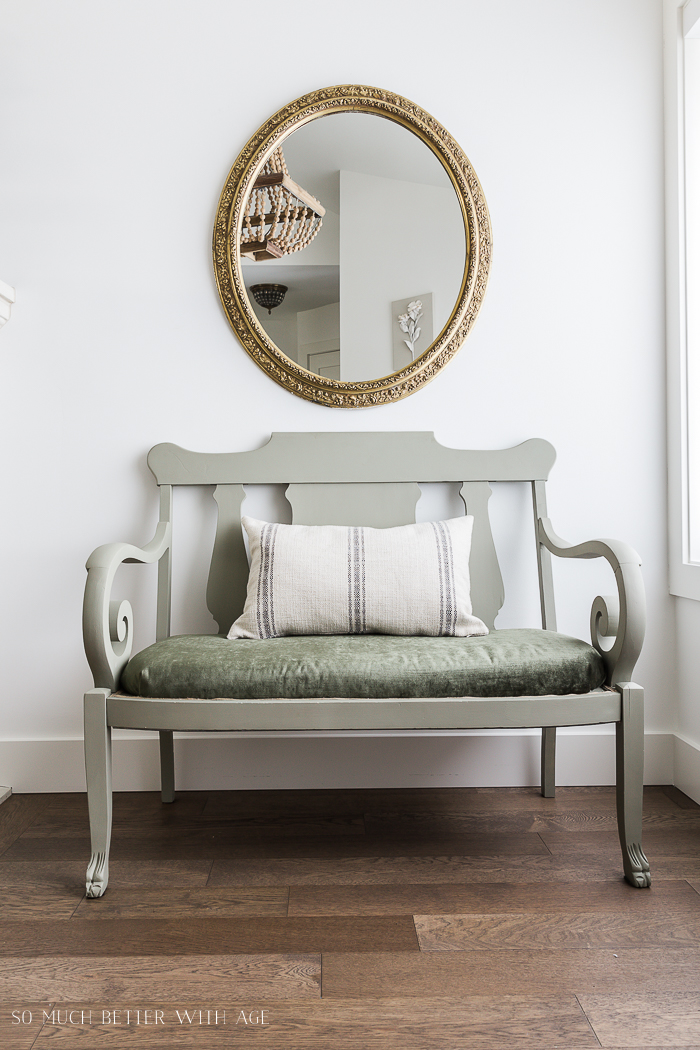
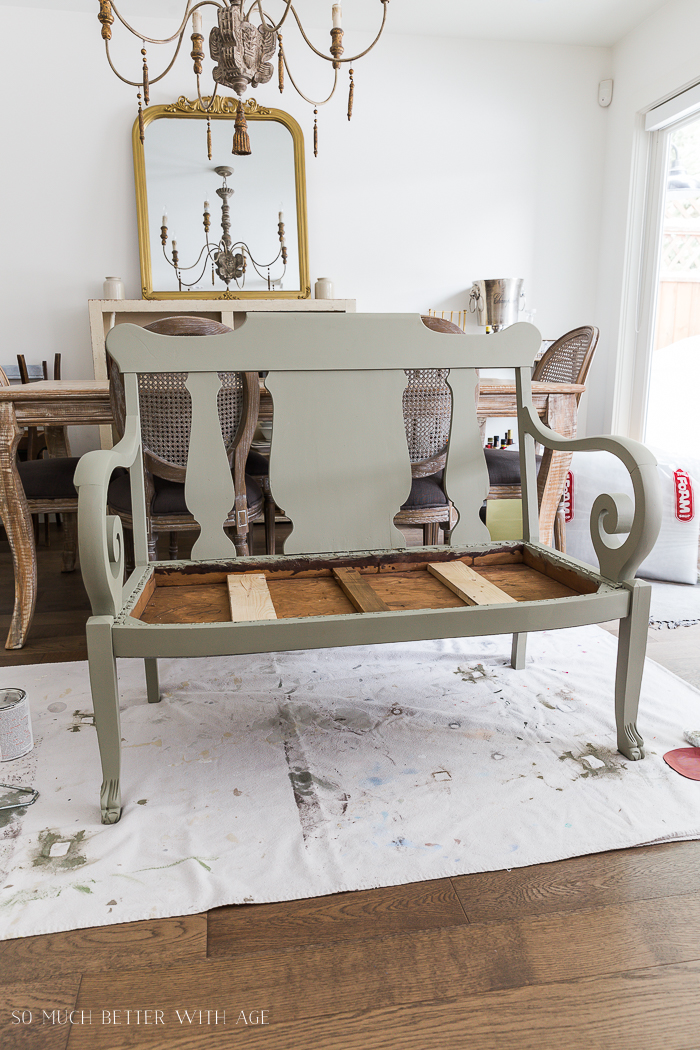
I was given this settee sofa and it was in rough shape. By giving it a makeover with paint and a new upholstered bench, it has been completely transformed. I can’t wait to show you how I did it.
I’m also joining some friends in a DIY – Back to Basics tour so if you’re coming over from Chelsea of Making Home Base, welcome! Didn’t she do an awesome job on framing her canvas art piece?
We’re all sharing DIY projects and getting back to the basics of how we all started blogging with DIY projects! Stay tuned because we’ll be sharing more throughout the coming months.
So here is my project, a settee bench makeover. Here are some before photos.
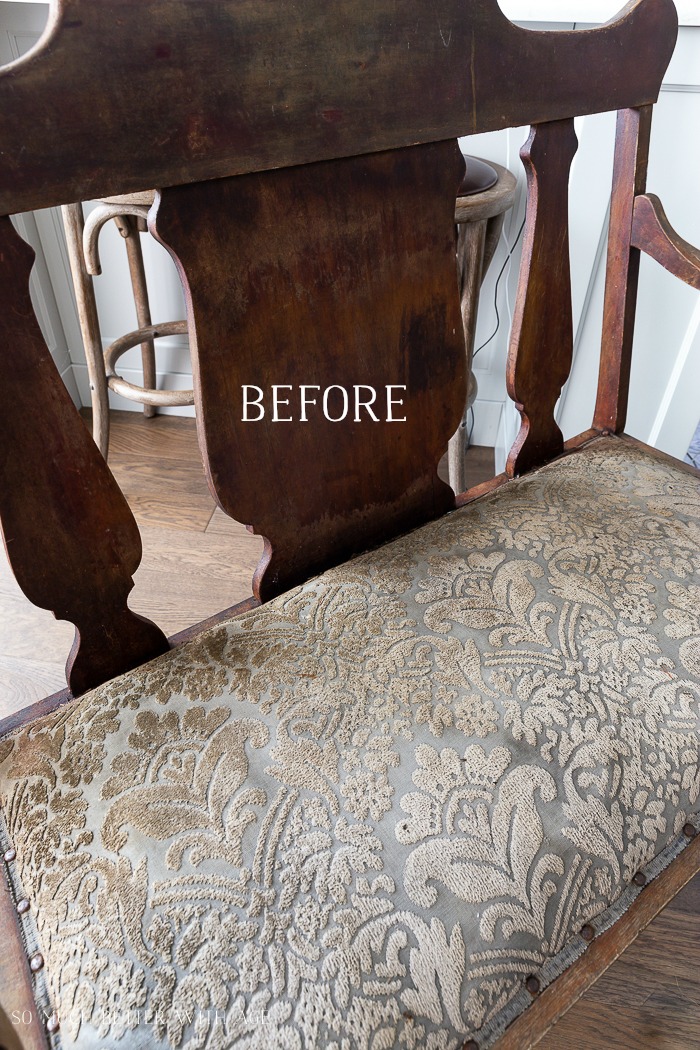
The Settee – Before
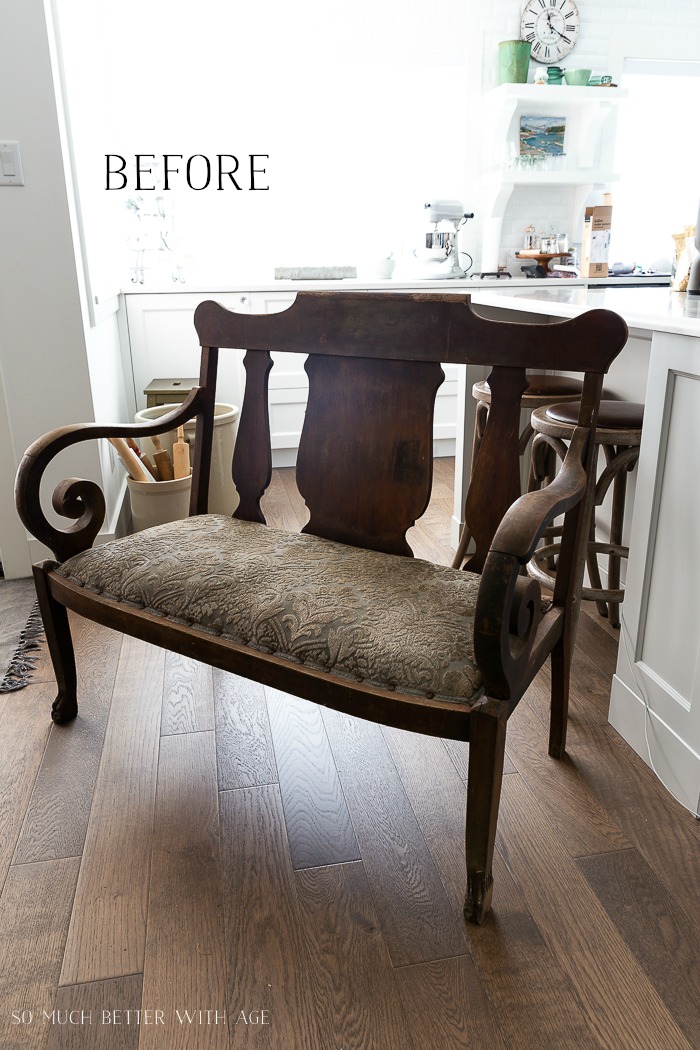
The wood was in bad shape and I had started to sand it down and noticed that the wood was all different types, which meant staining it was out of the question.
This post contains affiliate links for your shopping convenience. Click to read my full disclosure policy.
Where to Start
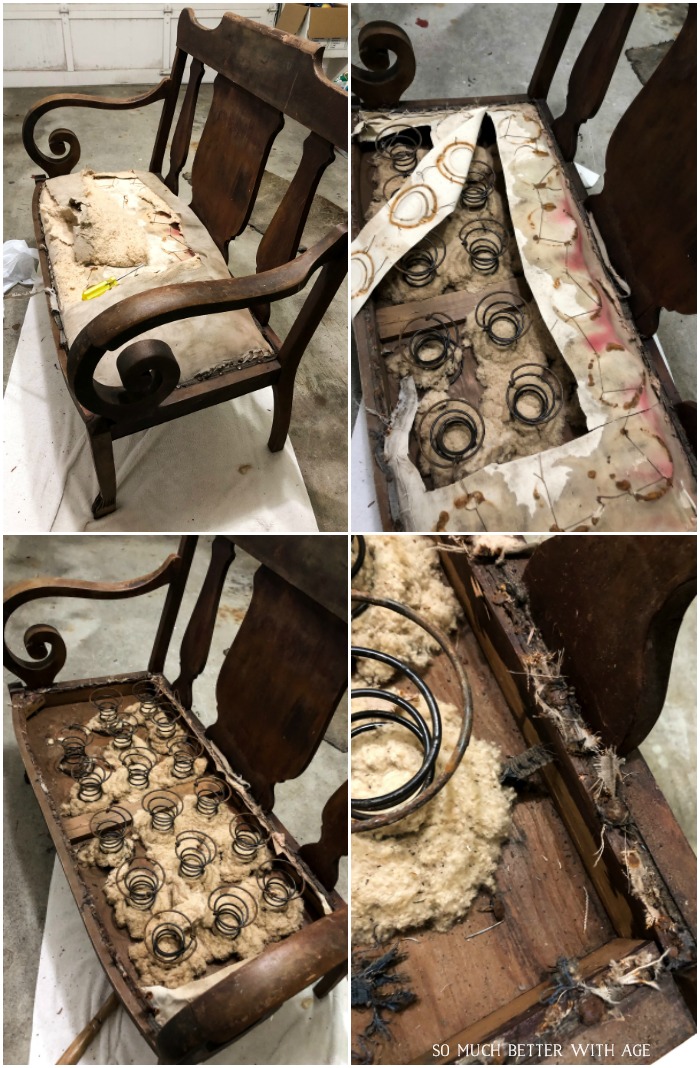
First, I got to ripping off the rotten fabric. That came off in about two seconds.
I ripped off the muslin fabric, the threads holding the springs in place and everything else in between.
The springs were the hardest to take out along with the thousand nails.
I used needle nose pliers and a flat head screwdriver to remove the nails.
Painting the Settee
I prepped and painted the settee just like I did in these recent posts.
How to Prep Furniture for Painting
How to Paint Furniture for a Professional Look
I used Lichen from Fusion Mineral Paint.
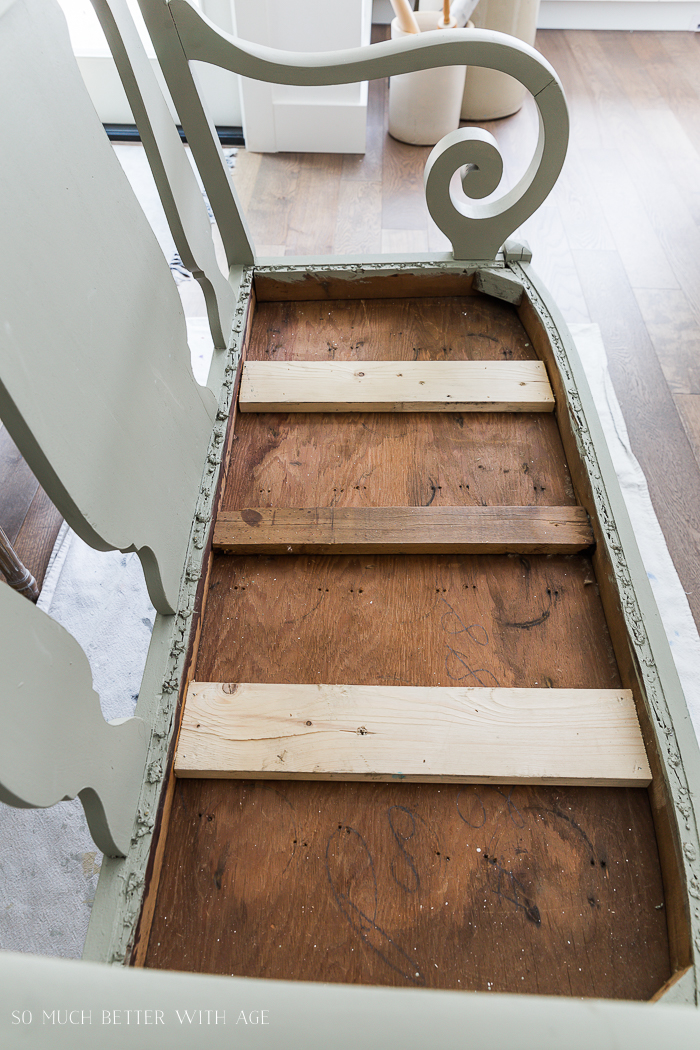
I knew I wanted to replace the springs with foam.
I nailed two scrap pieces of boards inside as there was a middle piece already in place.
This will make it even when putting the foam seating bench in.
Next, using a roll of kraft paper (I found some at the dollar store) I made an outline of the space inside the bench.
Cut a piece of kraft paper larger than the bench seat and outline it. Cut it out to make a template. You can take this template to a foam place to get a piece of foam cut out.
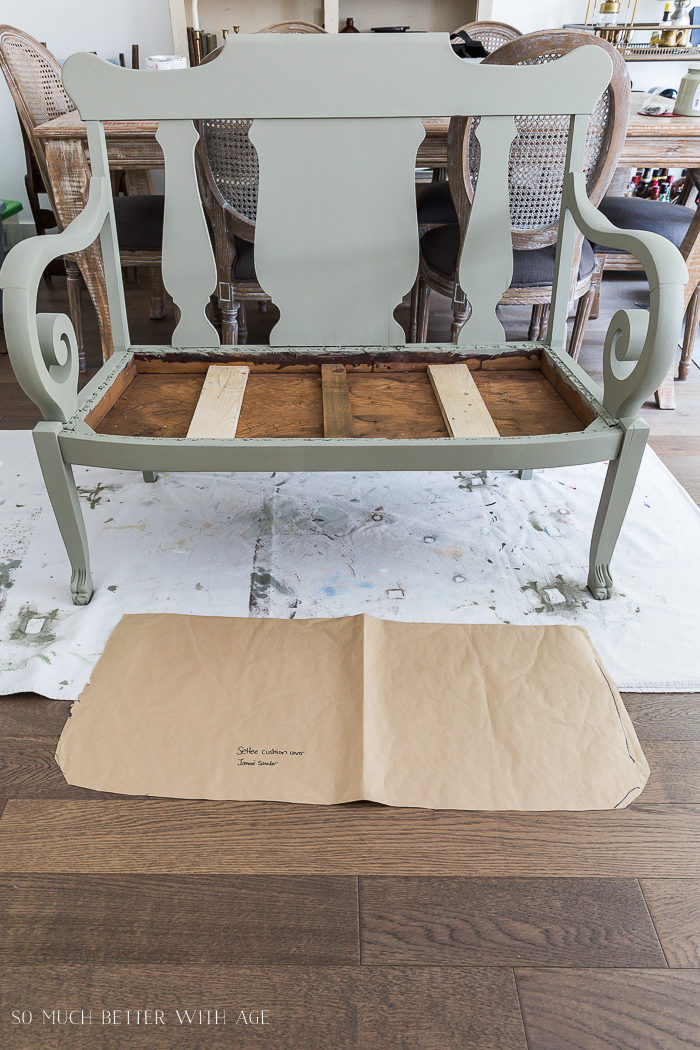
I also used that template to make a board so the foam can lay on top and I have something to staple it to.

How To Upolster the Bench Seat
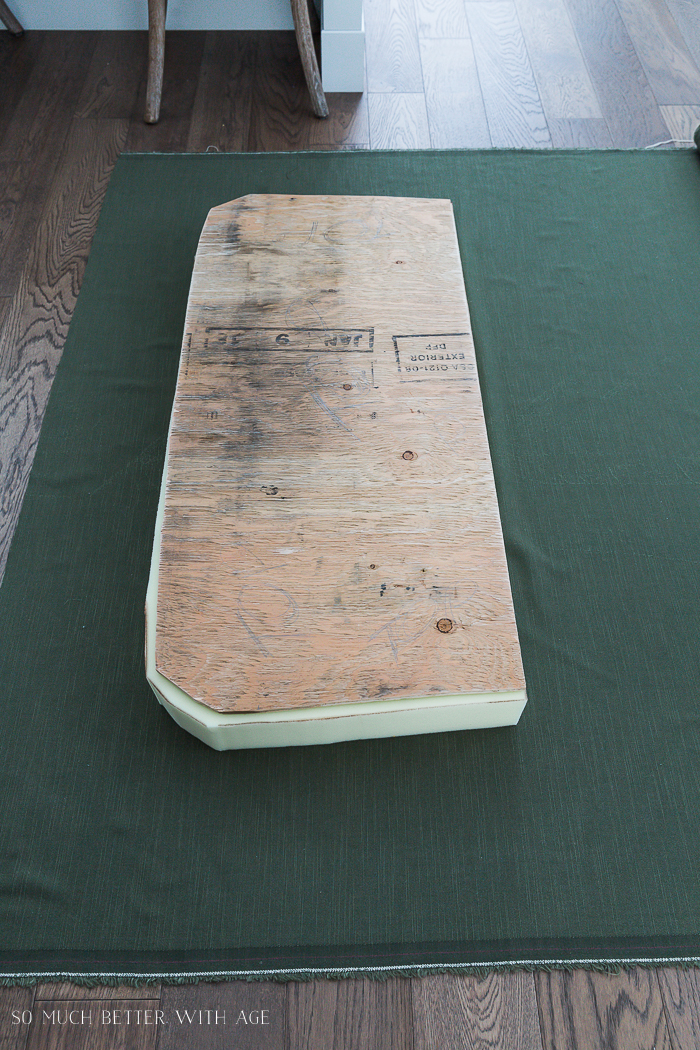
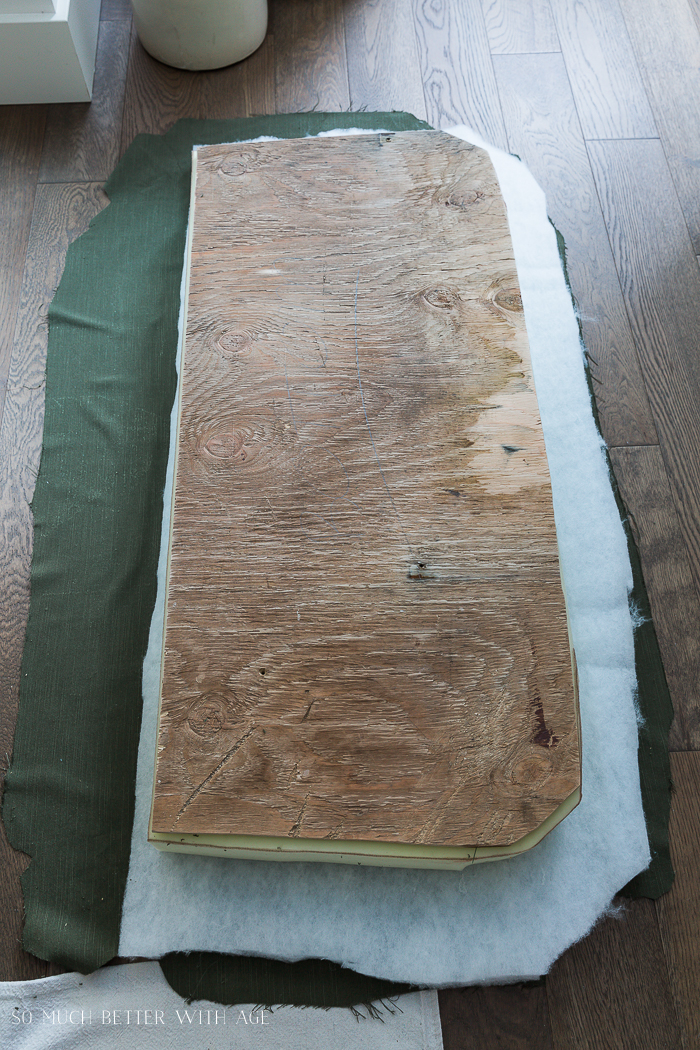
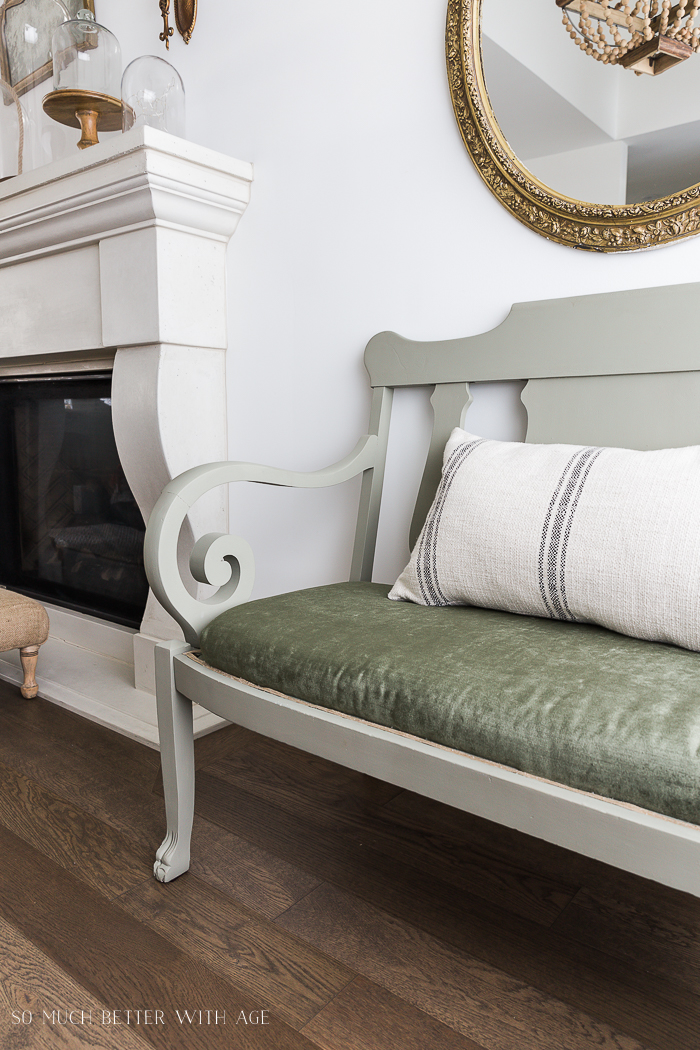
I bought this beautiful green velvet fabric to upholster the bench seat with.
Place the foam and board on the back side of fabric.
Cut a generous amount of fabric all around the seat to ensure there’s enough for stapling.
(Side note: I also had cotton batten but forgot about it during photos so I had to redo it!)
The cotton batten makes the seat more puffy and can be purchased at the foam place you visit.
The cotton batten doesn’t need to be along the back but just around the sides and front.
Pulling the fabric taut, staple in the middle of each side with a staple gun.
I used 3/8″ 10 mm light duty staples but I’m sure any kind will do.
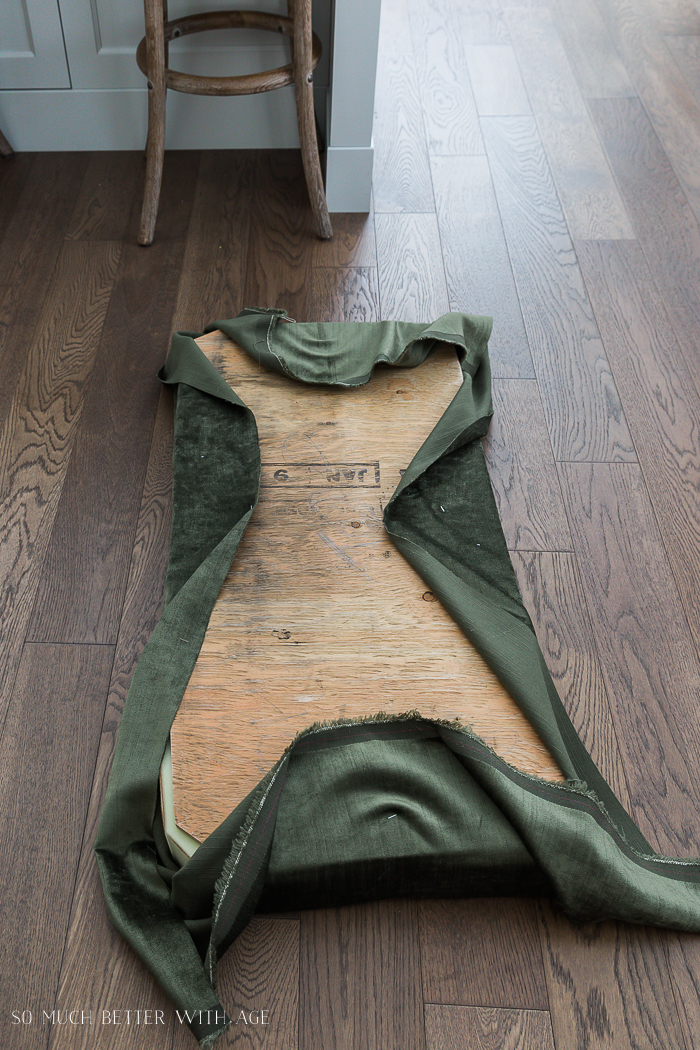
Continue stapling next to the middle and expanding out. Make sure to staple a side then move to another side to make sure the fabric is upholstered evenly.
This prevents pulls in the fabric.

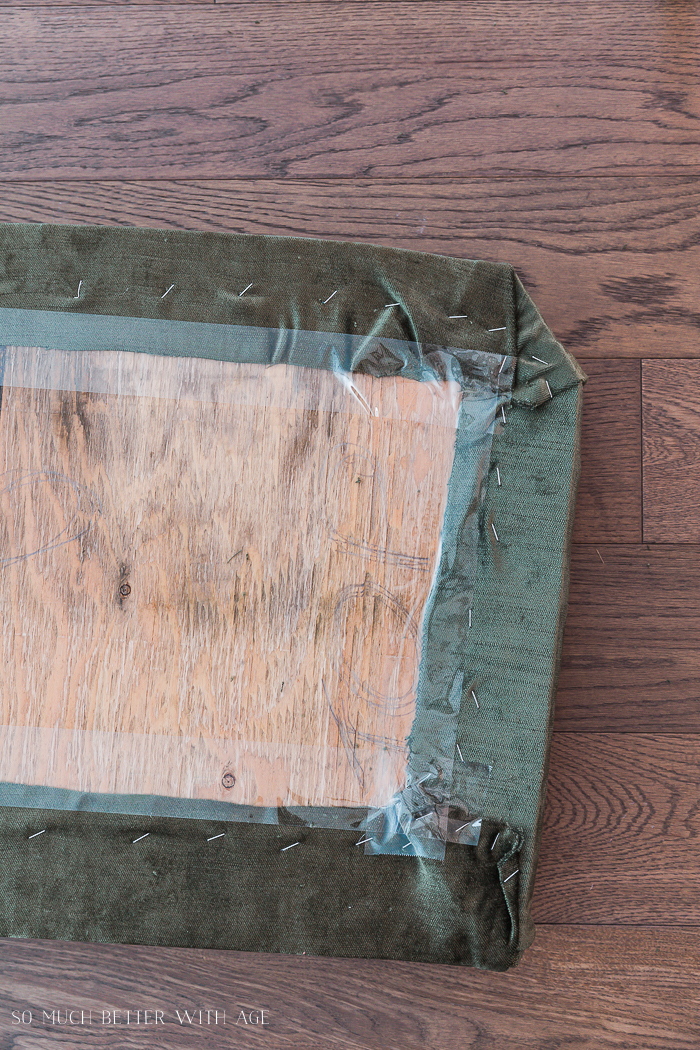
Once you have all four sides done, cut off the excess.
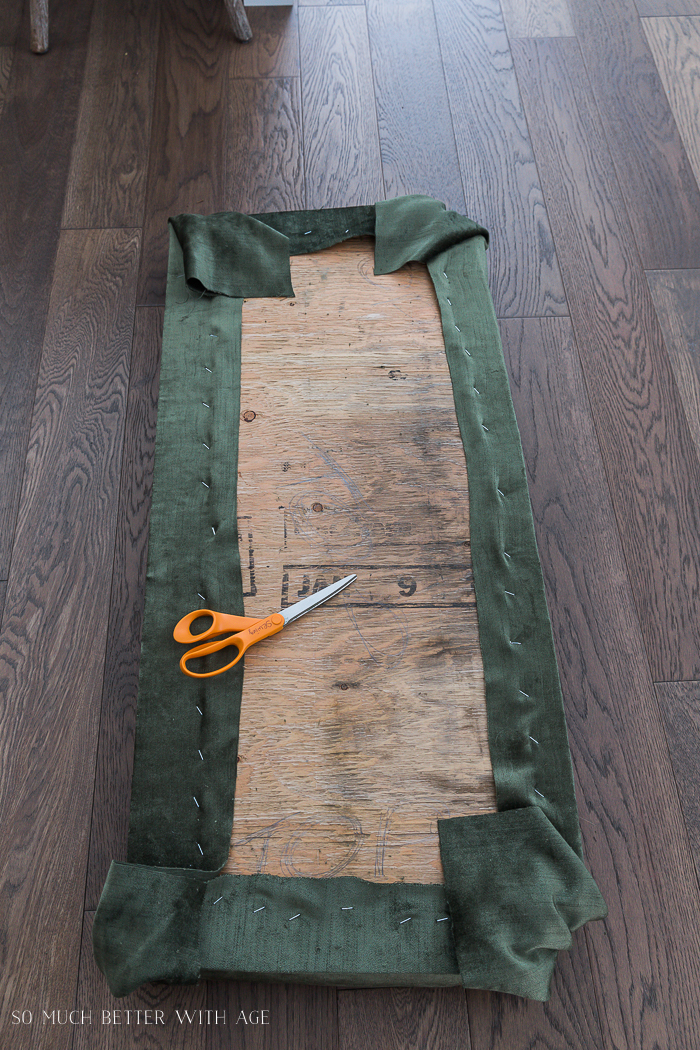
For the corners, pull the middle part of the fabric in and staple it down. Then pull one side over the middle and repeat to the other side.
Finish with some extra staples and trim the excess fabric.
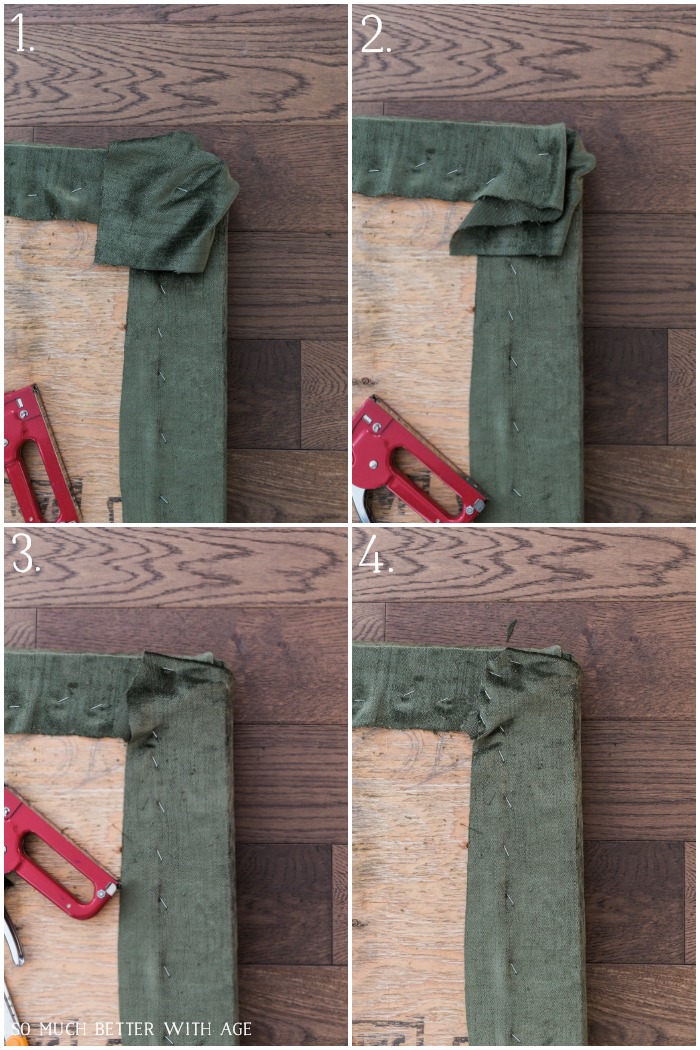
You want the corners to have two ‘pleats’ on either side and no other pulls in the fabric. Keep moving and playing with the fabric until you see it laying the way you want and then staple it down.
You might need to take out some side staples to get it lay flat nicely.

I tape all the edges down with packing tape (nothing fancy here!).
Turn the bench seat over and push it into the settee. It will be a nice snug fit so it won’t come out.

Finish off the edging by hot glueing ribbon all around.

I can’t believe the difference and I’m so glad some paint and a new upholstered bench seat gave this settee bench a whole new look!
I hope you liked this tutorial on how to give a settee a makeover and how to reupholster the bench seat.
Now be sure to continue on the tour by visiting Laura of The Turquoise Home and my other blogger friends in this tour.
Make sure to pin it for later!


DIY Framed Canvas at Making Home Base | Settee Makeover at So Much Better with Age | How to Patch Drywall at The Turquoise Home | DIY Bathtub Tray at Rain on a Tin Roof
Click in Case You Missed:
16 Essential Tools for DIY Projects


I bought a vanity bench once that needed work. It looked to be about 1930 or so. I figured I could recover it, strip off the crud and make it beautiful. It had that wonder waterfall edge in front. Wow, surprise! It wasn’t good wood but bass wood painted to look like great wood. Once I took off the first layer all was exposed. Guess that was typical of the times. Mrs. Winchester, of the Winchester Mystery House, had vast amounts of beautiful mahogany painted to look like pine! Pine was trendy but she had mahogany around her doors and windows. The curators were shocked to find it, once restoration began!
Your bench turned out great! I would add gimp around the edge to cover the under piece.
Isn’t that amazing how they ‘hid’ the wood? I always thought anything old would be amazing wood. That’s so funny about all that mahogany painted to look like pine! And yes, I’m going to add gimp. It needs just a bit more around the edges. Thanks so much for sharing!
Hugs, Jamie
Thanks for your tutorial. The settee looks amazing.
Thanks Karolina!
Hugs, Jamie
It is an old and now lovely piece of furniture, it has a wonderful shape.
Thanks Marlene!
Hugs, Jamie
It looks beautiful. Great job and thanks for the tutorial!
Thanks Jena!
Hugs, Jamie
Hi Jamie,
This is great info. I have a wicker couch with three separate cushions for the seat. They never stay in place and I’ve been wanting to make a on piece seat for a long time. Never thought of using kraft paper for a template, so now I’m set to go! With a snowstorm expected for tonight, I guess I have a bit of time to get this ready for our porch this spring.
Your bench turned out so well, such an inspiration.
Hi Margo,
Yes, I can only imagine how the three separate cushions on your wicker couch would be. A template is so easy to make and bring in to a foam shop. You can also use wrapping paper if you have that on hand.
Hugs, Jamie
Jamie, this is gorgeous! Love the packing tape trick- sometimes simple is best. The green velvet is swoonworthy- beautiful job all around.
Thanks so much, Monica!
Hugs, Jamie