
The Ultimate Guide on DIY Antique Mirrors + Video
This is your ultimate guide on everything you need to know about DIY antique mirrors (how to antique a mirror).
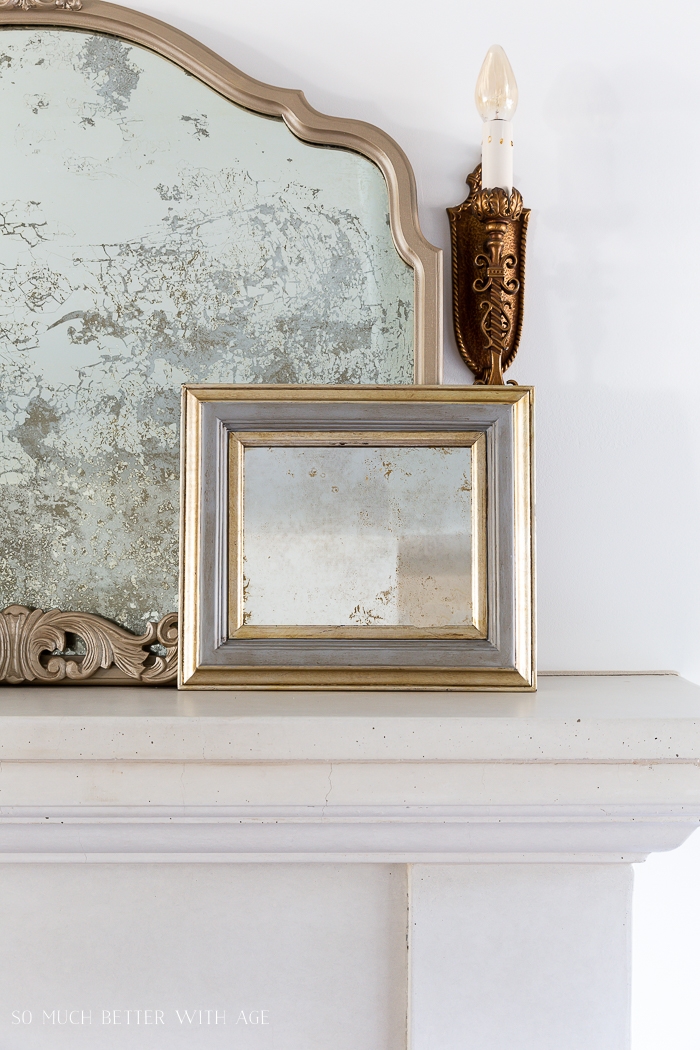
I am obsessed with mirrors especially antiqued mirrors. I love adding a mirror to every room and one that looks antique just adds so much character to it.
I’ve made many antique mirrors and some have turned out awful and some are perfection! I know all the tricks of how to avoid making an awful antique mirror and wanted to share my knowledge with you so you can avoid my past mistakes. Here is my Ultimate Guide on DIY antique mirrors.
When antiquing a mirror, it can be really difficult to get right. If you’ve taken too much of the reflective background off you are left with just glass.
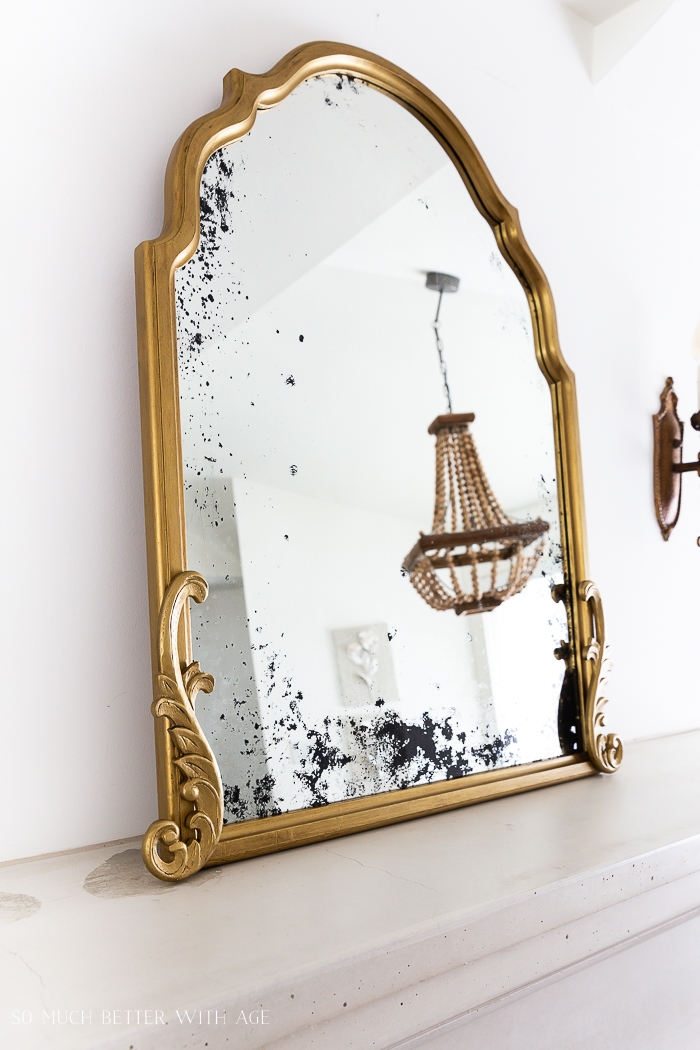
When I say ‘antiquing a mirror’, I mean taking off some of the reflective material on the back of the mirror to have spots of black show through. Over time older mirrors would tend to do this naturally. By antiquing your own mirror, you are creating this old patina yourself as today’s mirrors are made to not flake off on the back.
Parts of a Mirror
First, here are the parts of a mirror so you have a better understanding of how to antique it.
- Glass
- Reflective material (usually aluminum, tin, silver or copper melted over the glass)
- Paint
3 parts to Antiquing a Mirror
- Removing the paint from the back of the mirror.
- Removing a bit of the protective shiny material on the glass with muriatic acid.
- Painting the back with paint.
You want to work from the back of the mirror.

Disclosure: This post may contain affiliate links. Please read my disclosure policy.
supplies:
- drop cloth
- plastic garbage bags
- mirror
- paint remover/stripper
- chip brush
- plastic scraper
- chemical gloves
- paper towels or soft cloths
- eye protection
- face mask
- funnel
- plastic spray bottle
- muriatic acid
- Amy Howard Antique Mirror Stripper (optional)
- Mirror Effect (optional)
directions:
Part 1 – Removing the Paint
1.Lay down a drop cloth in a well ventilated area (garage or outside) then lay down a sheet of plastic larger than your mirror (I typically cut open garbage bags and lay them flat).

2. Remove the mirror from the frame and lay face down with the painted side facing up.
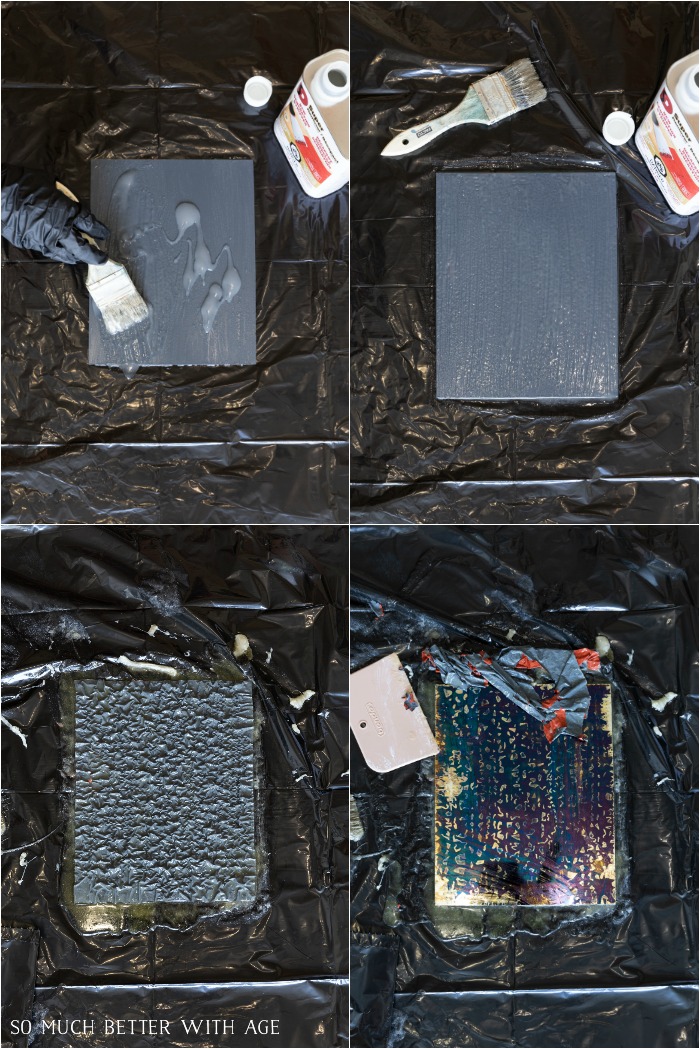
3. Pour on a generous amount of paint stripper and spread it on evenly with a chip brush. Let sit for about 10-15 minutes. You’ll want to make sure the stripper doesn’t dry out in that time frame. If it does, add more.
4. Test an area to see if the paint is starting to lift up. If it is, scrape off the paint with the plastic scraper right onto the plastic. If some paint is left behind you might need to add more paint stripper and remove again but it almost always it comes off one time. Note: the paint may bubble like the photo or it may not.
5. Wash the area with water and a wet paper towel or a wet soft cloth. Move the mirror and roll up all the plastic and dispose of it properly. Lay down the mirror onto the drop cloth and wash again with water and a cloth to make sure all the residue is gone.
Tip: You can also wash the mirror off by hosing it off under water in the backyard or in a tub of water.

Part 2 – Antiquing the Reflective Material
The next major part of antiquing a mirror is to remove some of the reflective material. You have to work fast so be sure to have everything that you need close by.
So there are two ways you can apply muriatic acid:
spraying on with a spray bottle
dabbing on with a cloth
Spray bottle – this will give you a subtle antiquing effect and if you spray just around the edges, it will create a more natural look. It depends on what kind of look you are going for to determine which method you’d like to use.
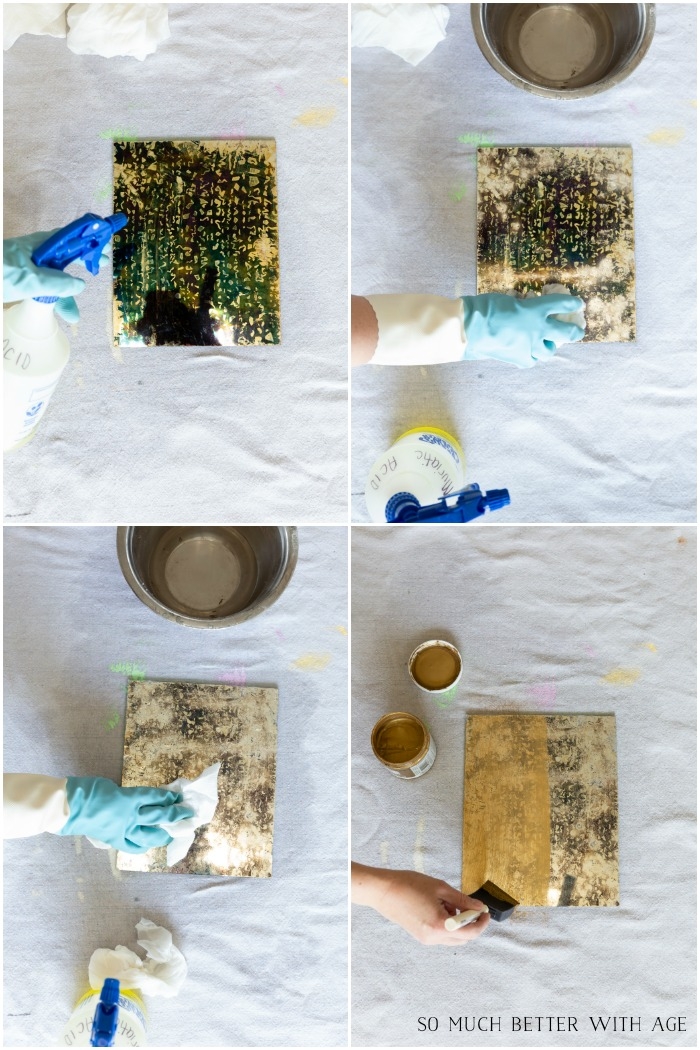
Dabbing with a cloth – you can see in the photo below where I’ve dabbed on the muriatic acid the muriatic acid (dark spot in the middle doesn’t have acid). Wearing chemical gloves, I poured some of the acid into a plastic container (carefully) and dipped a soft cloth into the acid and dabbed the cloth onto the mirror.
In this tutorial, I use a spray bottle technique.
6. Wearing face protection and gloves, carefully pour the muriatic acid in the spray bottle with a funnel. You can also dab the muriatic acid with a cloth directly onto the mirror but I find spraying it on easier. BE EXTREMELY CAREFUL WITH MURIATIC ACID AS IT CAN GIVE YOU A CHEMICAL BURN.
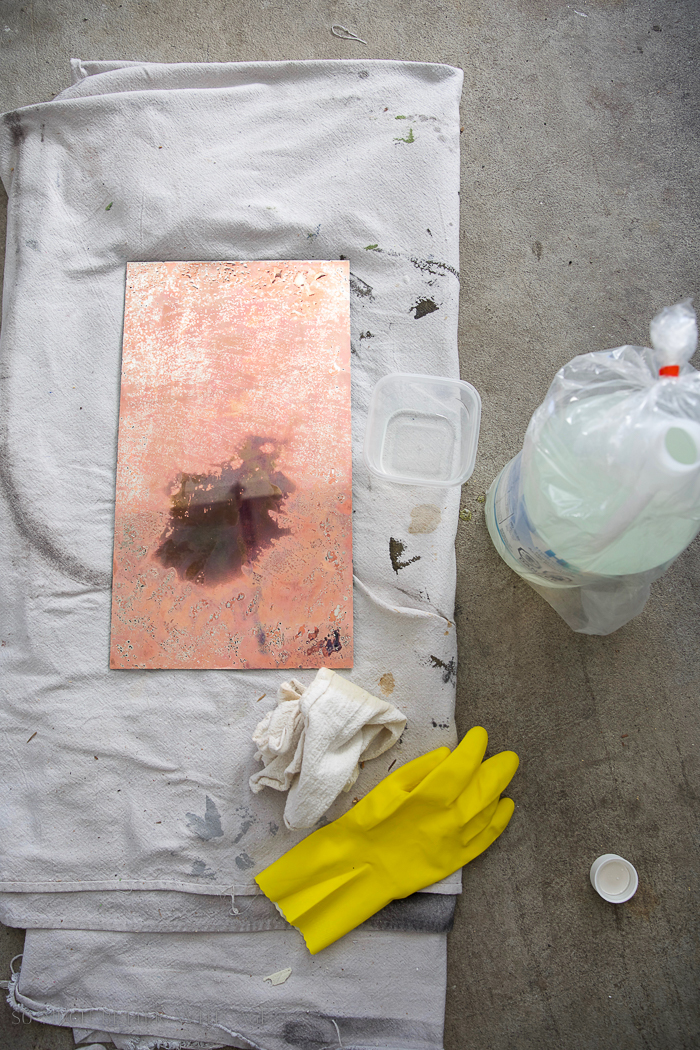
7. Spray all along the sides of the mirror (this is typically where an antique mirror natural ages). Dab off immediately with a damp cloth. Spray again and dab. Wash the area again and lift up the mirror to see the other side to see how much has come off. Keep spraying and dabbing until you are satisfied with the amount of reflective film that has come off.
Note: If you take too much off, all you are left with is plain glass so take it off a little bit at a time. Check out Tips & Tricks below and my YouTube video on how to fix that!
8. Wash again with water and a soft cloth to make sure all the muriatic acid is removed and let it dry.
9. Paint on two coats of paint with a roller or brush letting dry at least one hour in between coats. I like to use gold or a charcoal grey. Whatever color you choose, is the color that will show through from where you removed the reflective film. Once completely dry, put the mirror back in the frame.
what not to do:
Before you start, you want to remove the mirror from the frame itself. Seems like an obvious step, right? The mirror insert from my rustic mirror was so well glued in that I tried to do this technique without removing it from the frame and it just made a huge mess. Even if you have to take it to a glass shop to remove the mirror, it’s worth the extra step. If there are no obvious nails or hooks holding the mirror in, you can take a blade to cut away the seal (usually silicone) or take it to a glass shop to remove.

Don’t swirl the muriactic acid around to remove the reflective film
I had to go to the glass shop to get another piece of glass cut for it.

3. Painting the Back of the Mirror
Now that you’ve taken the paint off and antiqued your mirror, you will have to paint the back of the mirror. Because you have removed some of the reflective material, it essentially becomes glass so you’ll definitely need to paint it.
Most often I paint the back of the mirror black or grey but painting it gold or bronze is so beautiful, especially with a gold mirror frame.
You can brush the paint on with regular acrylic paint and a paint brush (I’ve even used chalk paint and it works fine). You can also spray paint the back of it.


Tips & Tricks
- If getting glass cut, get two pieces cut so you have one to practice on. Now you have a back up mirror from the same source so you know what you’re dealing with. Mirrors are all not made the same way and may have a tough layer of protective material. I’ve had mirrors that needed a lot of acid to remove any bit of protective layer and other mirrors where just a tiny spray was added and it lifted off the glass completely. When you buy a mirror from an vintage or thrift shop, you will only have that one. But if you need to get the mirror cut, get two cut.
- The paint will come off better in warmer climates.
- Work from the back of the mirror, you won’t be able to work from the front.
- Mirrors that are ‘made in China’ typically will not antique. They have a different way of producing mirrors.
- If you find that your paint stripper will not remove the paint, you can try Amy Howard Antique Mirror Stripper
- Did you take too much reflective material off? You can use Mirror Effect spray paint to add a mirrored look back on the glass. Add some short blasts of black spray paint around the edges as well for a natural aged look. My YouTube video shows you how to do this!
- Muriatic acid is powerful stuff. Make sure to do this DIY project outside or in a garage with the garage door open. Put down lots of plastic or newspaper and be sure to dispose of it all properly.
- Wear thick gloves not the flimsy disposable kind. I usually use dish gloves (chemical gloves would be better) as they are thick and I can toss them after if I get too much acid on them. This can’t be stressed enough! You can get a very serious chemical burn from the acid. Use at your own risk.
- Wear a protective mask to protect yourself from breathing in the strong fumes.
- Wear protective eyeglasses just in case the acid splashes.

I hope you found my Ultimate Guide to DIY antique mirrors helpful! I hope with these tips you’ll feel confident to antique/DIY/age your own mirror today.
video:
Be sure to watch my YouTube video on how to antique a mirror including all my tips and tricks!
Want a free Printable PDF of this guide?
To download this 6 page PDF guide, subscribe to my newsletter.
If you are already a subscriber, you’ll have access to the printable in your inbox.
Make sure to pin it for later!


Click in case you missed:
Free PDF – How to Antique a Mirror
Anthropologie Inspired French Gold Mirrors


Oh my thank you for all this information on the mirrors … so needed this
Thanks Norma.
Hugs, Jamie
Great how to, your mirror looks great!!
Thanks Pam!
Hugs, Jamie
I love how the mirror turned out. And your tutorial is so detailed so we can get the same look. Great job.
Thanks Debra!
Hugs, Jamie
I love this! For starters, your mirror is gorgeous. Secondly, I’ve never even though of antiquing my own mirror. That is brilliant. Thanks so much for sharing your tutorial (and tips and tricks) with us at Merry Monday this week!
Thanks Marie!
Hugs, Jamie
Great tutorial!
Do you know what this style mirror is called? I picture it being attached to an old fireplace mantel or vanity. It’s absolutely gorgeous.
Thanks so much, Katie! I’m not sure what this mirror is called. I haven’t been able to find one similar to it online 🙁
Sorry I couldn’t be more helpful.
Hugs, Jamie
Hi there, I just attempted to do this with an old mirror handed down to me by a neighbor, but after several lengthy attempts we were unable to get the painted backing off of the mirror (and we tried two different kids of stripper, including the “old” kind that isn’t available any longer). We tried for several hours; nothing budged. The back looks as new as it did before we started. Do you have any idea how to tell if the back of the mirror you’re working with can be removed or not? It looked just like every other mirror back I’ve seen on your blog and in videos about this process. Any tips for finding one that works?
Hi Dava,
Sorry for the delay in getting back to you. If the mirror is ‘made in China’ it probably won’t work. I had that listed in my Tips & Tricks above. Sorry about that.
Jamie
It wasn’t 🙁 I actually called the manufacturer and it was made in the US. I think the problem may be that the chemical that actually works in paint stripper was banned a few years ago and the products available now don’t remove the backing. I tried several products on several different mirrors. Such a bummer.
Hi Dava,
That is so bizarre! I’m in Canada but I can see on Home Depot’s website (US website) that they have lots of paint strippers available. Are you in California? It says it’s not sold in California. This is just an example of a paint stripper, not the exact one I’ve used but very similar: https://www.homedepot.com/p/Jasco-1-qt-Premium-Paint-and-Epoxy-Remover-QJPR501/308267701
Let me know!
Jamie
Where do you find mirrors that are not made in China? I’m having a hard time finding any. thank you!