How To Make Curtains With Blackout Lining
8 Step Tutorial – How To Make Curtains With Blackout Lining
I’ve made ALL the curtains in my house. Curtains are expensive and sometimes not even that great. Especially curtains with blackout lining. I find the ones you buy in the stores are not really dark enough to block the light.
Generally, curtains are pretty easy to make. In a nutshell, all you need to do is stitch up four sides. And just so you know, I’m not a seamstress by any means! In fact, I’ve always disliked sewing. I never wanted to learn and it has always frustrated me. So if I can do this,you can do this! It may look complicated but trust me, it’s easy.

Because I really don’t know how to sew {I can just sew straight lines!}, I made up this tutorial so there might be a more efficient way of doing it, I don’t know. I also don’t know the technical terms for anything so bear with me.
Before we begin, let me just add that blackout lined curtains are a MUST for any child’s room. My kids won’t sleep if there is light streaming through at 5 am and that means I don’t sleep! I’ve bought many different types of blackout curtains over the years and I find that they are just not dark or heavy enough. You have to buy the actual blackout fabric from a fabric store, the kind that is heavy, the kind that hotels use!!
Okay, so let’s begin!
SUPPLIES
- Fabric or flat sheets {floral sheets I got at Home Sense / linen fabric from here}
- Blackout lining {I bought mine from Fabric.com}
- Sewing machine
- Tape measure
- Iron and ironing board
- Fabric scissors
- Pins
TUTORIAL
STEP 1
{Make sure your curtain rod is already hung on the wall} To find the length, measure from the curtain rod height down to the floor. Add an extra foot.

STEP 2
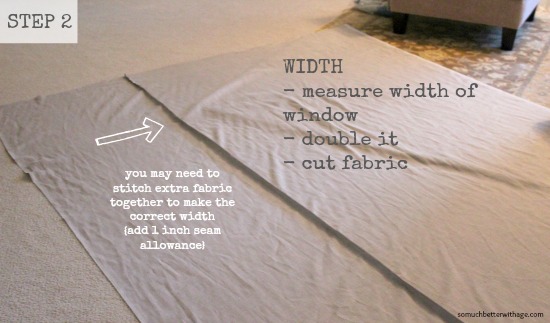
To find the width of one curtain panel, measure the width of your window frame then double it {or you can use 1 1/2 times the width of your window frame}.
For example, if your window width is 50 inches wide, the width of your curtain panel will be 100 inches wide. Since you are making two curtain panels for each window, each panel will need to be 100 inches wide.

These look beautiful. I love that gray!
NewlyMynted
Thanks Stephanie!
Jamie
Great tutorial! Pinning this!
Thanks so much Elizabeth!
Jamie
Jamie! What a great tutuorial! Totally pinning this! And…I am going to try your pinch pleat trick!
Please consider submitting your project to Stylish Feature Fridays!
Thanks Karen! I have a bunch of stuff to send to you. It’s on my to do list!
Thanks for the invite.
Jamie
Thanks for this great tutorial–my adult daughter actually gets up in the morning and goes to bed in her guest room because the light comes thru her curtains so strong. I will share this with her!
Thanks Sandy. Your daughter definitely needs to to do this!
Jamie
LOVE the pleats idea, stealing:), see I told you:). You have so many awesome ideas girl!!! Enjoy the rest of your week, Jen
Aww, thanks Jen!
Jamie
Love this tutorial. I tried to do a DIY curtain tutorial, but yours is better! I wanted to pin this, but don’t see a Pin Option? Thanks for linking up with PinIt! Tuesday. I am a new follower now!
haha, it’s hard to sew and take photos at the same time! Sorry, I’ve fixed my pin option. Oops!
Jamie
What a great tutorial! I might try adding this to my curtains in the bedroom; it’s way to bright!
I’m visiting today from Savvy Southern Style. I co-host a Linky Party Tuesday (open thru Sat) and I’d love for you to link up! I hope you get a chance to stop by, link up and leave a comment, too!
~ Megin of VMG206
Join me each Tuesday for Brag About It Link Up Party
Thanks Megin!
Jamie
I need to do this! I keep putting it off because I love the sheer curtains/girly roller blinds in my daughter’s room, but she keeps waking up too early. Thanks for showing a cute option for blackout curtains!
I know!! I hate when they wake up too early. It really does help them sleep in longer….well 7 am. But it’s better than 6 am!
Thanks for stopping by!
Jamie
Fabulous tutorial Jamie! Your home is beautiful. Thanks so much for sharing on Project Inspire{d}…pinning! 🙂
Nancy
Thanks Nancy 😉
Jamie
What beautiful sheets! Love that print. This is a great tutorial on making your own lined shades. Thanks for sharing at Silver Pennies Sundays! x
Thanks Danielle 😉
Jamie
Featuring you tomorrow on my blog and Facebook!
Xo
Isabelle
Wow, thank you so much, Isabelle!!!
Hugs,
Jamie
CONGRATS!!
You have been featured at The DIY Dreamer! YAY! Come on over and grab your featured button, you deserve it!
http://thediydreamer.com/from-dream-to-reality/rustic-features-70/
Thanks so much, Christine!!
Jamie
Great tutorial and gorgeous curtains Jamie. Thank you for linking up at Shabbilicious Friday.
Thanks Kerryanne!
Jamie
What a great tutorial!!! I am definitely pinning this and sharing it. I can’t make curtains, but now I really think I can, and want some just like those grey linen ones you made. You don’t feel like making some more do you? Featuring at my party tomorrow too. Starts at 1:00 PST. Thanks!
Thanks again 😉 You made my day {okay, maybe weekend ;)}
Hugs,
Jamie
Fantastic tutorial and the drapes look wonderful!! Thanks for linking up at Feathered Nest Friday!
Thanks so much, Courtney!
Jamie
Thank you for this! One question, does the blackout lining get sewn under the hem at the bottom?
Hi Kristen,
No, you don’t have to worry about sewing the blackout lining into the bottom hem. I did it once with the first set of curtains I made. It seemed to bunch a lot at the bottom. As long as they are stitched into the sides and top, it will just hang nicely with the weight. Good luck! Thanks so much for stopping by.
Hugs,
Jamie
These look lovely, thank you so much for sharing! I’ve pinned your tutorial for future reference as I’m sure it’ll come in handy at some point.
I’ve come over from the Le Chateau Des Fleurs linky party 🙂
xo
Thanks so much Jess!
Hugs,
Jamie
Your curtains look great.. the fabric looks great too. Easy tutorial to follow.. Thanks so much!
Thanks so much, Christine 😉
Hugs,
Jamie
Thanks for posting your sources for fabric. So many don’t and it’s so frustrating,
Thanks Donna! I know it’s hard to find sources out sometimes so I wanted to include it 😉
Thanks so much for your comment!
Hugs,
Jamie
They look great! I’m with you, the store bought really aren’t dark enough.
Thanks so much! It’s true, right?
Hugs
Jamie
Fabulous tutorial, I love it. Thanks tons for linking to Inspire Me. Hugs, Marty
Thanks Marty!
Jamie
Love this! I’m going to be installing curtains in our rental (um, after 5+ years) using Command hooks and rods. (I waited this long because I didn’t want to drill!). Question about the width of the panels. You mentioned that for a 50″ window, you would measure out 100″ width of fabric. And since there will be two panes, that EACH needed to be 100″. Does that mean 200″ total width? Thanks!
Hi Adrienne,
That’s such a good idea about using Command hooks! Yes! You figured it out correctly. I know, it’s a bit confusing. Basically for one panel you double with the width of your window or if you don’t have enough fabric you can always do one and a half.
Thanks so much stopping by 😉
Hugs,
Jamie
Hey girl. I had not seen a post from you in awhile. YOU know I love your blog
Hi, Enjoyed the article and just about to do some curtains, but I am considering the benefits of stitching the blackout material into the curtain. I prefer the look of a single curtain, but doesn’t it make cleaning difficult as the blackout material cannot be machine washed?
Thanks, Al
Hi Al, thanks for your comment! I don’t think blackout fabric is meant to be washed so you’re right, if you’re wanting to wash your curtains it’s best to not stitch them into your curtains. I usually dust and/or vacuum the curtains every now and then. I like the look of a single curtain too 😉
Thanks for stopping by!
Jamie
Hi! I loved your tutorial that I’m willing to try this; novice sewer here! I’m hoping to receive some guidance with the size of your flat sheets that you used for the nursery? I’m going to attempt to make these blackout curtains out of vintage sheets but keep hesitating since I’m unsure the best size? Would full size suffice? Two twin flats? Or queen flats cut in half vertically? Your feedback is greatly appreciated!
Hi Cecelia,
I used a queen size sheet set and had a lot left over so I’m sure two flat sheets would work great depending on the size of your window. If you need to use a fitted sheet, you can always cut off the elastic part.
Good luck!
Jamie
Thanks so much for the instructions! I’ve never done this before, and I can’t sew either lol. I’m starting first on the window on my front door, but using magnetic curtain rods. I’m excited to start on all (emphasis added lol) of my windows! I’m pinning this!
Good luck, Nancy!! Email me if you need any help: [email protected]
This is exactly what I have been looking for to make our curtains for 3/4 of the windows on our bottom floor and two rooms on out top floor! Thanks so much for sharing! I will definitely link back when I get them done and the room tour up on my blog!
Thanks so much, Ashley! Good luck 😉 And let me know if you have any questions!
Hugs, Jamie
Thank you do much for posting! Where did you get that fabulous gray linen fabric?
Hi Mis,
Here is the link for the fabric. I love it! https://www.fabric.com/buy/ur-212/european-linen-fabric-oatmeal?cm_vc=756b1813-cbc1-43b3-84bd-29889bf8fb7b
Hugs, Jamie
I love the color of these curtains! Your link to the fabric goes to the oatmeal color. Is that the same color you used?
Yes, that’s the same fabric I used, Jessica. I love it. I missed your comment, sorry it took literally months to get back to you. Good luck!
Hugs, Jamie
great tutorial! how dark do they make the room? I work night shift as a nurse and only found blackout curtains that aren’t the best looking and don’t block out that much light.
Thanks!
I have some drapery panels that are made out of a cream linen. I used blackout lining and now have black coming through in the pinhole/ stitch. Does anyone have a solution for this? Please help!
Hi Lisa,
Do you have black coming through because the lining is black? The blackout lining I bought was white on both sides.
Let me know and I’ll see if I can help.
Thanks, Jamie
Actually I am looking for a post on how to buy blackout curtains and I have landed on this page at the right time.
I am already on my way to a nearby curtain shop.
Thanks for the same.
Thank you so much for such a wonderful article of yours. I want you to know that is has helped me a lot.
And to help you with your duties at home, try our blackout curtains
Just visit us!
Great article. A must try for my own home DIY project!
Hi Jamie, Great tutorial guide and the drapes look Awesome!! Thank you for linking up at Feathered Nest Friday! Keep updating. 🙂
It’s amazing that you can have curtains that block out light really well. It would be great for me to get something like that! It would be so nice to be able to block out the light in my room.
It is actually a very good idea for a person like me, who needs complete dsrkness to sleep. Thank you for sharing.
Curtains are expensive and especially curtains with blackout lining. Finding the curtains that do not block the light. After reading this, I can say that curtains are pretty easy to make..