• Home
  • About
    • France
  • Published
  • Contact
    • Disclosure Policy
    • Privacy Policy
  • Nav Social Menu

    • Bloglovin
    • Facebook
    • Instagram
    • Pinterest
    • Twitter
    • YouTube

So Much Better With Age

  • Seasonal
    • Valentine’s Day
    • Easter
    • Spring
    • Mother’s Day
    • Outdoor
    • Summer
    • Fall
    • Halloween
    • Christmas
    • Winter
    • Parties
  • Organization
    • Organization
    • Printables
  • DIY
    • Crafts/DIY
    • Home Repair
    • Paint/Wax/Stain
    • Sewing
  • Decorating 101
    • Color
    • Decorating
  • Baking Recipes
  • House Tours
    • My House Source List
    • My Current House
    • My Previous House
    • The Old, Old House
  • Shop
    • Instagram Friends
    • My House Source List

May 22, 2014 · 21 Comments

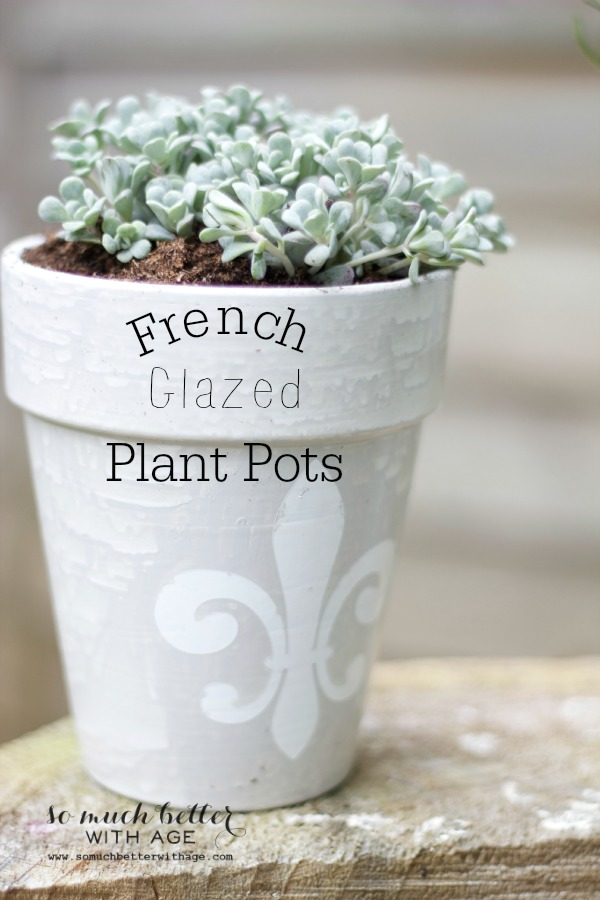
French Glazed Plant Pots

Crafts/DIY

16shares
  • Share
  • Tweet

This easy tutorial will show you how to make lovely French glazed plant pots.

French glazed plant pots - So Much Better Wth Age

One thing I really love is creating my own French style and in this post I will show you how to make your own French glazed plant pots but first I have something to share with you!

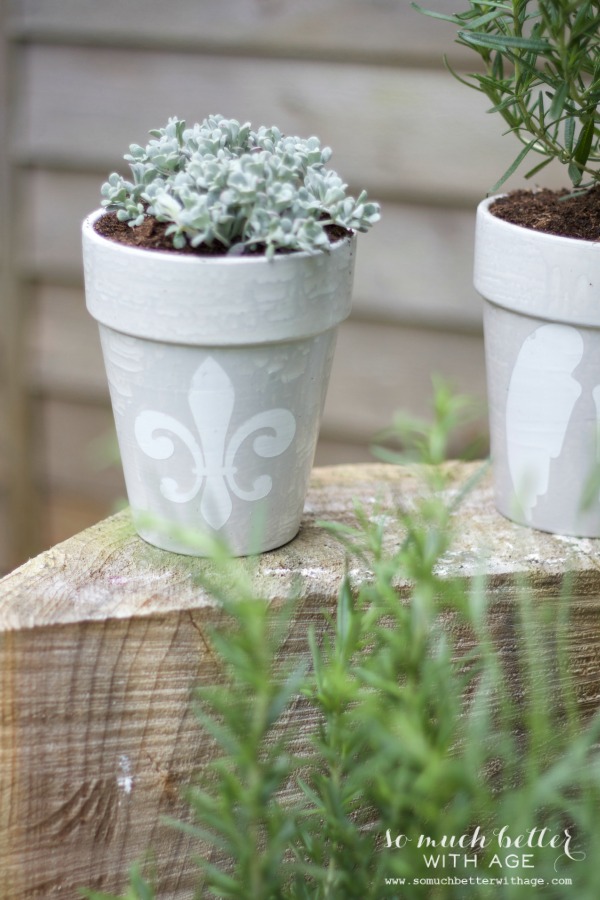
I call this project “French glazed’ because I absolutely love everything French. There really isn’t anything French about it, per se, just that the grey with the stencil makes it like something from France.

Let me show you how to make them!

French glazed plant pots / beautiful glazed pot - So Much Better With Age

This post contains affiliate links for your shopping convenience. Click to read my full disclosure policy.

Supplies:

  • unfinished clay pots
  • white latex paint (I used what I had on hand, just semi-gloss white latex paint, no color, just off the shelf)
  • grey latex paint (I used Behr Stonington Grey in semi-gloss)
  • stencils made from my Silhouette Cameo machine
  • OR you can purchase ready made stencils and use it with a foam pouncer brush
  • chip brush

Tutorial:

First start with a terra cotta pot.

French glazed plant pots / Terra cotta pots - So Much Better With Age

Here is how I made the glaze:

  • 1 part latex paint (white & grey)
  • (I used Stonington Gray by Behr & semi-gloss Behr for white, not mixed)
  • 1 part water

Mix together. It will be really runny. You can add more paint if you’d like to get more color depth.

Make sure to stir it up good and you may need to give it a little stir every few minutes or so.

French glazed plant pots / glaze - So Much Better With Age

You can use a chip brush or a good brush. Dip your brush in the paint and just paint it on.

It will be runny but that’s okay. You can brush over a few times until you like the way it looks.

French glazed plant pots / brushing on the glaze - So Much Better With Age

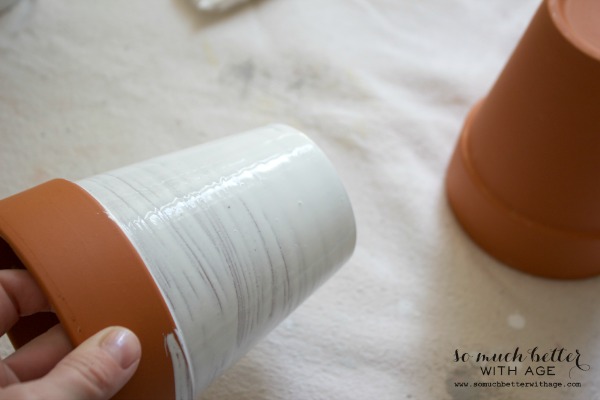
When you set it down to dry, the paint will run and leave marks. That’s okay.

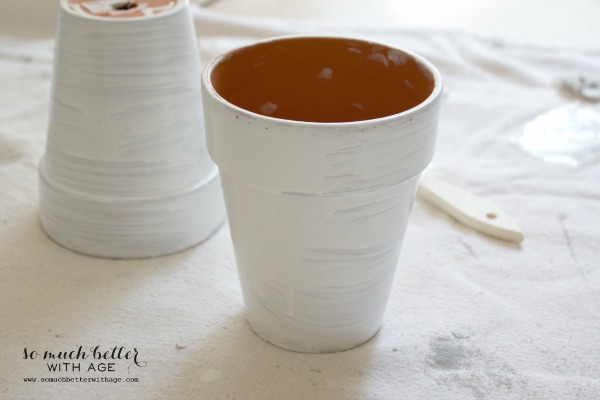
Wait for it to dry. Add another coat if you’d like. When it dries, it will look like a glaze (like you fired the pottery yourself in an oven, seriously) rather than just a regular ol’ paint job.

Wait to dry again.

French glazed plant pots / glaze drying on pots - So Much Better With Age

Next I wanted to add a graphic to each pot so I downloaded and cut some images via my Silhouette Cameo machine.

Note: If you are not using stencils like this, you can always stencil over the finished pot with a regular stencil and white paint. I’ll leave more details below.

French glazed plant pots / Silhouette vinyl - So Much Better With Age

Next, press transfer paper over them.

 French glazed plant pots / preparing the stencils - So Much Better With Age

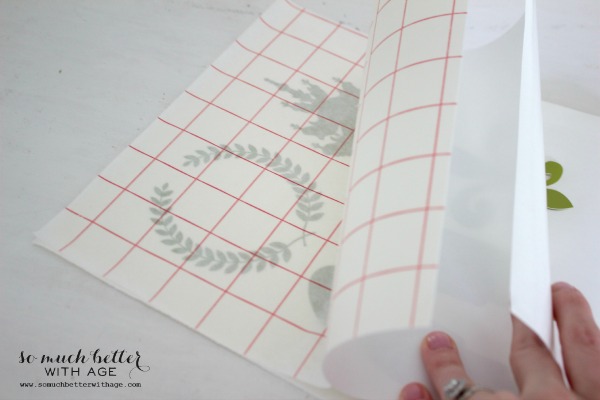
Press down with spatula.

 French glazed plant pots / transfer sheets - So Much Better With Age

Peel the transfer sheet away from the vinyl sheet and the graphics should be stuck to the transfer sheet now.

French glazed plant pots / peeling back the transfer sheets - So Much Better With Age

Press each image firmly over each pot.

French glazed plant pots / pressing the image on the pots - So Much Better With Age

 French glazed plant pots / Fleur-de-lis - So Much Better With Age

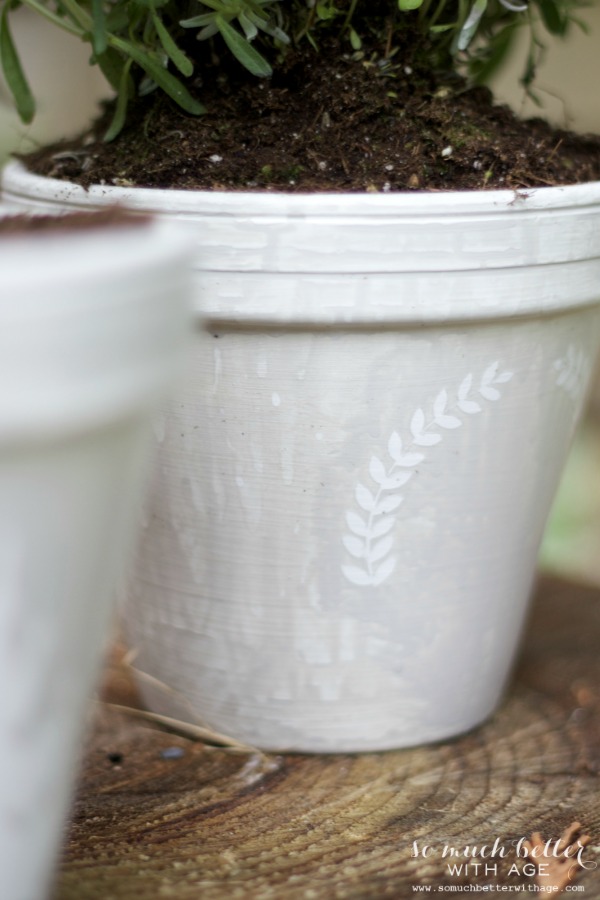
Next you’re going to mix another glaze with using the grey color. Paint this right over the image and the entire pot.

Once it’s nearly dry, pull your image off with a weeding tool (that fancy hook thing).

French glazed plant pots / pulling off the image once dry - So Much Better With Age

On some pots I spritz them with water just like Jen’s tutorial. It has such a cool effect!

If you are using a regular stencil, you can place your stencil over the finished pot and secure it in place with painter’s tape. Using a foam pouncer (round foam brush) and white paint, stencil in the area on the pot with the paint making sure to wipe excess paint off first onto a paper towel and use an up and down motion so the paint doesn’t bleed underneath the stencil. 

French glazed plant pots / potted plant - So Much Better With Age

I used a fleur-de-lis, angel wings, chandelier and laurel wreath.

French glazed plant pots / pots in garden - So Much Better With Age

They are so cute and pretty and well, French 😉

French glazed plant pots / pretty white pots in garden - So Much Better With Age

French glazed plant pots / close up of stencilled pot - So Much Better With Age

French glazed plant pots / potted plants on wooden stumps - So Much Better With Age

Why not try to make your own French glazed plant pots!

I have a few more pots to finish up in the reverse, grey first then white. I’ll be posting them on Instagram at the big event.

More from my site

  • Summer Tour with Flowers, Flowers, and More FlowersSummer Tour with Flowers, Flowers, and More Flowers
  • Pumpkin Spice CookiesPumpkin Spice Cookies
  • Get My Kitchen Look
  • Butler Pantry and Kitchen Office UpdatesButler Pantry and Kitchen Office Updates
  • My New French Mirror

Subscribe to get the latest

free goodies straight to your inbox

Previous Post: « Cotton Canvas Bags & Magnets Using My Silhouette
Next Post: My Office Has Goals »

Reader Interactions

Comments

  1. Krista @ the happy housie says

    May 23, 2014 at 6:48 pm

    These are absolutely beautiful Jamie! Good luck at your event – I’m sure you will be fabulous!

    Reply
    • Jamie says

      June 5, 2014 at 11:15 pm

      Thanks so much, Krista!! We had a great time 😉
      Hugs,
      Jamie

      Reply
  2. Tara says

    May 24, 2014 at 9:07 pm

    These are fantastic! Jamie – they looked just as good in person!

    It was so much fun to see you again today; we’ll have to make it a habit!

    Reply
    • Jamie says

      June 5, 2014 at 11:16 pm

      Thanks Tara, it was such a great event! I loved yours too.
      Hugs,
      Jamie

      Reply
  3. Jen @ City Farmhouse says

    May 27, 2014 at 3:06 am

    Yours are way cuter than mine!!! Love them!!!

    Reply
    • Jamie says

      June 5, 2014 at 11:17 pm

      No way 😉 Thanks Jen!!
      Hugs,
      Jamie

      Reply
  4. Shauna Oberg says

    May 28, 2014 at 2:04 pm

    Love these. So pretty!

    Reply
    • Jamie says

      June 5, 2014 at 11:18 pm

      Thanks for featuring them on your blog, Shauna!
      Hugs,
      Jamie

      Reply
  5. Brushes with a view says

    June 1, 2014 at 3:04 am

    Love these !! So elegant! Defiantly offering these in my shop for wedding center pieces !Thank you

    Reply
  6. A[email protected] says

    June 3, 2014 at 8:03 pm

    I love how these turned out! Thanks so much for sharing them at the Knick of Time Tuesday Vintage Inspiration party! Be sure to “like” Knick of Time on Facebook, so I can promote your blog and FB page there!

    http://www.facebook.com/KnickofTime
    Blessings,
    Angie

    Reply
    • Jamie says

      June 5, 2014 at 11:19 pm

      Thanks Angie! I’ve liked you now 😉
      Hugs,
      Jamie

      Reply
  7. nickirocky says

    June 7, 2014 at 1:15 pm

    Gorgeous. Going to have to try this! Found you via Fabulously Creative Friday and definitely my first like!

    Reply
    • Jamie says

      June 8, 2014 at 10:15 pm

      So glad I inspired you!
      Hugs,
      Jamie

      Reply
  8. Pamela says

    June 11, 2014 at 1:21 pm

    Love this little project Jamie! I need to figure out how to use my Cameo more. Thanx for partying at my place!

    Reply
    • Jamie says

      June 13, 2014 at 8:46 pm

      Thanks Pamela! I know, I always need inspiration to use my Cameo 😉
      Hugs,
      Jamie

      Reply
  9. Good Time Charlie says

    June 11, 2014 at 6:15 pm

    What a great tutorial!!! I hope the demo at the Garden show went splendidly. I love the pots, they came out just gorgeous. I am featuring tomorrow and definitely pinning! Thanks for sharing at redouxinteriors!

    Reply
    • Jamie says

      June 13, 2014 at 8:55 pm

      Thanks Karen! It went really well! Thanks again for featuring them 😉 Love your parties 😉
      Hugs,
      Jamie

      Reply
  10. Kerryanne @ Shabby Art Boutique says

    June 12, 2014 at 3:34 am

    Your glazed pots are so cute Jamie. I hope your event was a success and that it was puke free for you – lol.

    Reply
    • Jamie says

      June 13, 2014 at 9:04 pm

      Thanks Kerryanne! My event was puke-free! haha, thanks for asking 😉
      Hugs,
      Jamie

      Reply
  11. Amanda says

    June 12, 2014 at 8:10 pm

    These are so beautiful! I just love these adorable little pots! You did a great job, we would love it if you linked up with our party this week! http://www.kraftingkreations.com/2014/06/awesome-things-tuesday.html

    Reply
    • Jamie says

      June 13, 2014 at 9:07 pm

      Thanks so much, Amanda! I’ll be sure to check it out 😉

      Reply

Leave a Reply Cancel reply

Your email address will not be published. Required fields are marked *

Recipe Rating


Primary Sidebar

  • Bloglovin
  • Facebook
  • Instagram
  • Pinterest
  • Twitter
  • YouTube

Search

Categories

My YouTube Videos

“somuchbetterwithage”

My Book, French Vintage Decor

“somuchbetterwithage”

Footer

Copyright

All images and text on this site are property of So Much Better With Age. Please contact [email protected] to ask for all photo requests. Please do not take my images without first obtaining written permission from me. All free printables offered are for personal use only. Pinning is always welcome and appreciated.

Copyright 2010-2018

Categories

Archives

Let’s Connect

  • Bloglovin
  • Facebook
  • Instagram
  • Pinterest
  • Twitter
  • YouTube

Looking for something?

House is clean, sun is shining, life is good. Hope House is clean, sun is shining, life is good. Hope you’re having a good Saturday💚 
.
.
.
.
#somuchbetterwithage #idcoathome #greigestyle #interiordesign #neutralhome #neutraldecor #lonnyliving #sodomino #whitekitchen #kitcheninspo #kitchengoals #mydecorlove #vancouverinfluencer #yvrinfluencer #canadiandesigner
Do you know what all these beautiful rooms have in Do you know what all these beautiful rooms have in common! They are all painted in the same paint color - White Dove OC-17 by @benjaminmoore. 💚 White is one of the hardest colors to pick for your home. It can pick up different surrounding colors which is why you can’t just Google a paint color and paint it on your walls. 💚 For my home, Simply White has worked the best. And White Dove is very similar. Swipe to see  some of these gorgeous rooms. 💚➡️ Check my blog post for tips on the best way to pick any paint colors for your home. Link is in stories and in highlights. 
.
.
.
.
#somuchbetterwithage #whitepaint #whitewallcolor #howidwell #howwedwell #idcoathome #greigestyle #homewithrue #howtopickpaintcolors #whitedovepaint #benjaminmoore #designblogger #diyblogger
Last year I totally organized my kitchen pantry an Last year I totally organized my kitchen pantry and tea/coffee/vitamin station and I’m happy to say it still looks the same! Having a spot for each item that you use regularly is so important. Start by checking out my blog post and reading all the tips I have on how to easily measure your cupboards and buy only the organization items that you need. Happy organizing! 💚➡️ Check stories or my highlights for the direct blog post link. .
.
.
.
#somuchbetterwithage #imsomartha #homeorganizer #homeorganization #homeorganizationtips #konmari #konmarimethod #kitchendesign #kitchenorganization #pantryorganization  #organizedhome #organizationhacks #organizingideas #designblogger #diyblogger #yvrinfluencer #vancouverblogger
I love green! The color and greenery. Although I k I love green! The color and greenery. Although I kill most plants so they don’t last long here. I know spring is far far away but this year is really dragging on so far 😂💚🌿🌱
.
.
.
.
#somuchbetterwithage #jungalowstyle #mydomaine #apartmenttherapy #ruedaily #myplantaesthetic #greigestyle #idcoathome #howidwell #howeedwell #simplystyleyourspace #neutraldecor #instahomedecor #homewithrue #designblogger #diyblogger #vancouverinfluencer #yvrinfluencer
Making your own pillow covers is easier than you t Making your own pillow covers is easier than you think! I love changing out my throw cushions on my couch and just being able to store pillow covers is far easier than the whole pillow. 💚 I can only sew straight lines so if I can sew these, you can! It’s an envelope pillow pattern so no zippers or buttons involved. Swipe to see the back of the pillow (chair photo) ➡️ Check stories for the direct blog link and I’ll save it in highlights in my profile. 
.
.
.
.
#somuchbetterwithage #pillowtutorial #sewingpattern #diyhomeproject #diyhomeprojects #diyhome #showemyourdiy #diysewing #diysewingpattern #diysewingproject #diysewing #envelopepillow #livingroominspo #yvrinfluencer #vancouverinfluencer #diyblogger #designblogger
Did you know how much of a difference trim, basebo Did you know how much of a difference trim, baseboards, doors, doorknobs and stair railings make? Like a huge difference! I’m talking all about it on my blog today. Lots of before and photos and details! 💚➡️ Check stories for the direct blog link and in a highlight in my profile. .
.
.
.
#somuchbetterwithage #baseboards #doortrim #doors #stairrailing #stairrailings #homerenovations #neutraldecor #neutralstyle #neutraldecorating #idcoathome #greigestyle #howidwell #howwedwell #ruedaily #interiordesign #interiordecorating #vancouverdesigner #yvrinfluencer #designblogger
Our basement is the perfect place to store seasona Our basement is the perfect place to store seasonal / holiday / decor items. I’ve had plenty of it over the years (too much!) as I’ve been blogging for 10 years! I went through all my Christmas decor this year before I packed it all away and got rid of so much! It felt so good. 💚 Next, I’ll do the same for the other holidays coming up (like Easter, I have 2 bins just for Easter!). Decluttering is easier when it’s done in stages. I’m also really into minimal seasonal decor lately so I think it will be much easier to say goodbye to the extra ‘stuff’. 💚➡️ What about you? Do you have lots of seasonal / holiday / decor items in your home? ➡️ Check out my blog posts on how to organize these items in IG stories. .
.
.
.
#somuchbetterwithage #organization #homeorganization #homedecluttering #imsomartha #idcoathome #homeorganizer #organizingtips #organizingideas #konmari #knomarimethod #yvrinfluencer #vancouverinfluencer
Sometimes it helps to look at your home in terms o Sometimes it helps to look at your home in terms of square footage not how the builder or the previous owner used it. My dining room was once a family room but with our small main floor already having a living room and a very small dining room, we thought this room would be better suited for a bigger dining room (swipe to see the before with the cabinet, the before before when we first bought it and the reno) 💚 It pays to look at your home differently especially during this pandemic. I think we’re all going to look at how we use our homes differently going forward. 💚➡️ What about you? Do you use a room for a different purpose than what it was intended for? .
.
.
.
#somuchbetterwithage #diningroomdecor #diningroomdesign #diningroomgoals #gooduseofspace #idcoathome #currentdesignsituation #simplystyleyourspace #neutraldecorstyles #neutraldecorating #mydecorlove #fromhousetohaven #vancouverinfluencer #yvrunfluencer #designblogger #diyblogger
Oh man, I am so sentimental. It really makes it ha Oh man, I am so sentimental. It really makes it hard to also be a person that is organized and hates clutter! I’m a sentimental purger! 😂 I feel most happy when everything has its place and I’ve kept a few meaningful things, but not too many. Just the right amount. It’s a very fine balance, isn’t it? Do you have a hard time with letting go of sentimental items? I have lots of tips of in my blog post ➡️ Check stories for the link and I’ll keep it in my organization highlight in my profile. Also, I share how to organize and store kids school memories and artwork with free printables!
.
.
.
.
#somuchbetterwithage #sentimental #declutteryourlife #decluttering #declutteringtips #konmari #konmarimethod #mariekondo #imsomartha #homeorganization #homeorganizationtips #organizationhacks #howtodeclutter
The mini transformation in our dining room is now The mini transformation in our dining room is now complete! I took some black frames from IKEA and using Rub n Buff made them look vintage gold. 💪🏻 I’ve used Rub n Buff many times before but never over black! (Thanks for the tip @jennasuedesign 💚) ➡️ Check stories or my profile for a link to my blog post. 
.
.
.
.
#somuchbetterwithage #diycrafts #howwehaven #howihaven #homewithrue #howwedwell #idcoathome #ssmakelifebeautiful #vintagedecor #showmeyourdiy #showemyourdiy #frenchvintage #cornerofmyhome #cottagehomedecor #frenchvintagestyle #yvrinfluencer #vancouverblogger #diyblogger #canadiandesigner

Copyright © 2021 · captivating theme by Restored 316
· Privacy Policy

We use cookies to ensure that we give you the best experience on our website. If you continue to use this site we will assume that you are happy with it.OkRead more